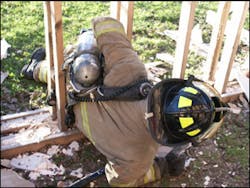
The first consideration is making a hole in the wall so that the studs are exposed. You want to begin this task on your knees. You are going to have to crawl through this hole that you make, so it is pointless to begin making this hole standing up.
In the last article we discussed some of the reasons that a person or crew would want to breach a wall. Also, we talked about some of the obstacles that you can expect to encounter when breaching a wall.
So let's move forward to the actual act of breaching a wall and making your way through it. The first consideration is making a hole in the wall so that the studs are exposed. You want to begin this task on your knees. You are going to have to crawl through this hole that you make, so it is pointless to begin making this hole standing up, unless you are making some sort of inspection hole.
Clear either the sheetrock or lath and plaster from the side that you are working from. If the material covering the wall is lath and plaster, you can knock a hole in the wall about half way up on the area that you are going to be working with, stick either an axe handle or the forked end of a halligan in the wall and pull the tool towards you. The motion will resemble pulling the handle of a slot machine, without the expectation of any money of course. This will remove a large section of the lath in one motion. If you are working with sheetrock, you can either punch several holes in different locations and then focus your efforts in between the holes that were created so that large sections of sheetrock are removed. Or you can simply start from the top and work your way down clearing sections of sheetrock as you go.
Common Mistakes During Wall Breach Operations
Two common mistakes are generally made when clearing out the wall covering: first is that the hole is not started high enough, which will cause your bottle to get caught on the top side of the hole when you are trying to get through and the other is not clearing out the jagged edges of your newly created holes. The latter will also cause your air bottle to get caught in any number of locations. Taking the time to start high enough and clearing out the edges of your hole will save you time and energy when you begin to make your way through the opening. Generally if you start making the hole in the wall at head height, while in the kneeling position, you should be alright.
I have heard discussions and have seen people try different methods of breaking out sheetrock. I have heard that you can sit with your back to a wall and use your bottle to break out the sheetrock. After one fire in New York, crews that were in the room that the firefighters were trying to get out of stated that all they found was indentions in the wall where the bottle of a SCBA had impacted the wall. Yet the sheetrock stayed intact. I have also heard that you can take your pack off and use it as a battering ram. This would be a bad idea due to the fact that any kind of swinging motion might pull your mask off, not to mention the damage that can be done to the pack, causing it to malfunction when you need it the most.
At some of the Firehouse Expositions, I have witnessed students use their feet in a mule-type kick or in a forward-type kicking motion. This method will work but is not as effective as using your tools and you will exhaust yourself much quicker. Using your hands to punch out sheetrock is another method. Once again, this method will work but is much slower and more exhausting. If you are caught without any tools and need to breach a wall, keep in mind that there are studs located in every wall. Do not ever punch a wall; use your hand in a banging motion where the side of the hand impacts the wall first. This will keep you from breaking your hand and rendering it useless. Once you have a hole established, then you can begin tearing away the sheetrock. All of these questionable methods can be avoided if you just bring a tool with you whenever you enter a structure that is on fire.
If you are breaching a wall to get from one room to another, either as an emergency exit or for access, keep in mind that you have a good chance of encountering some type of furniture on the other side of the wall. If you are going from the living room of one apartment into an adjoining one, you are likely breaching into the living room of the other apartment as well. You could encounter sofas, tables, entertainment centers, armoires, and so on.
We have now created our hole in the wall that is of sufficient size. Now we have to squeeze through this hole. Studs are generally on 16-inch centers. This is large enough for most firefighters to get through. Some will get through this opening much easier than others. The first thing that we want to do is to make sure that the place we are going to is a better environment than the one that we are leaving. This is why we go headfirst and not feet-first.
The most common mistake when breaching a wall is made after the hole is established. Firefighters tend to forget their hand tool. Your hand tool is one of your best friends at this point, don't leave it behind. Place the tool through the hole and to the side. Do not throw the tool through, you may not get it back or be able to find it. Placing it to the side should prevent you from landing on it while making your way through the opening. If it is the adz end of a halligan, well, we can all imagine how bad that could hurt.
Five Methods for Escape
The first and easiest method for making your way through the studs in a wall is to remove one of the studs. You do this by striking the base of the stud with your hand tool. This will create a larger opening. The opening will be much larger at the floor than what it will be three feet up from the floor due to the broken stud being free at the bottom and attached at the top of the wall. You will still face the same obstacles of wiring, piping and fire blocking. If you are without any type of tool, you can attempt to kick the base of one of the studs out. If the studs are metal, removing them at the base of the floor will be much more difficult. Fortunately these metal studs will easily bend if you go up just a few feet from the floor. Remember that metal studs will conduct electricity.
The second method is called the "Superman". You will get on your knees, raise your arms above your head in an exaggerated diving motion, and lean in between the studs. Depending on what type of SCBA your department employs, you will then need to tilt to one direction or another. With Scott packs, you need to tilt to the right due to the fact that the pressure reducer is on the left side of the pack. Leaning the opposing way will place this reducer more towards the center of the opening, allowing you to make your way through easier. After you have worked your helmet, SCBA, and hips through the opening, you can then straighten your body up and crawl the rest of the way through. The direction that you tilt will be dictated by the construction of your SCBA. A brief overview of your department's packs is always a good way to begin this exercise.
The next method is the bottle first method. You begin by placing your tool through the opening and to the side. Next, sit flat on your bottom with your legs straight in front of you. Place the bottle completely in the opening. Place one arm behind and above your head, and through the opening. Next, work your head and helmet through the opening. Then being pulling your body through the opening. You may need to twist your hips to get them through the opening. Remember, when you are going through an opening, you probably won't have anything to hang onto. You will be dealing with a smooth, flat wall.
The fourth method is the reduced profile. For this method you will also need to have an intimate knowledge of your department's SCBA. The first step is to either undo your waist belt or to loosen it up. Which ever way is easier in blackout conditions will be fine. Next, loosen up your shoulder straps. You will remove the arm on the side opposite of your low-pressure hose. Since my department uses Scott packs, I would remove my right arm. I would then go through the opening with my right arm first, while using my left hand to hold onto the base of my SCBA. By leading with my right arm my SCBA will not fall off of my left shoulder. By placing my left hand on the base of my SCBA, I can now manipulate my pack as I make my way through the opening. Once on the other side of the opening, place your right arm back through your right shoulder strap and tighten the shoulder straps down. I do not concern myself with reattaching my waist belt. Remember, this is an emergency situation. Your SCBA will stay on just fine without the waist belt and it will not create any type of hazard.
The final method is the emergency method. Again, you want to undo your waist belt. Next, loosen both shoulder straps. Now, remove both of your arms from the shoulder straps. You must keep a hand on the shoulder strap that accompanies your low-pressure hose. On Scott packs, this will be on the left side. You must never lose control of the left shoulder strap or whichever shoulder strap is with your low-pressure hose. If you were to lose control of this strap, there is a good chance you will have your mask pulled from your face. With your pack now firmly in both hands, place it out in front of you and crawl through, on your stomach, the opening. Once on the other side of the opening, place the SCBA back into position on your back. For an added segment to this exercise, make the participant place the pack on without getting back to their knees. They must stay as low as possible when putting the pack back on.
Improve Skills Through Training
After you and your crew have preformed each of these methods and feel comfortable with them, try doing them blacked out. This is another way to help simulate a worse case scenario. Also remember to have each participant practice their Mayday procedures before making any type of opening. By practicing this procedure each time, it will help to reinforce the importance of using the Mayday.
There is not one cure-all method when breaching a wall. My advice is to try each method several times over the course of multiple training sessions. See which one works best for you. What works best for the officer may not be the best option for the 23-year-old, 165-pound rookie. By practicing each of these methods, you will find out very quickly what you like and do not like. Once you find what you like, practice it. I would also suggest that you still practice the other methods just in case the method that you prefer is not an option on the particular wall that you have just breached. Never limit yourself to one method only, when there are several out there. All of these methods are just another tool to place in your repertoire.
Building the Wall Breach Prop
I have included detailed schematics for the front and side views, several pictures, a step-by-step instruction plan for building a wall breach prop and a materials and cost list. Feel free to improve on the prop. You can run wire or some type of piping through it for added realism.
Please send any ideas for future training drills, or suggested improvements and variations on this drill, to my e-mail [email protected]. You and your department will receive credit for any ideas used in future articles.
Related Articles:
- Company Level Training - Wall Breach Part 1
Larry Manasco has been with the Fort Worth, TX, Fire Department for 12 years and has served as a lieutenant for the past three years. He holds the classification of Fire Officer I and Hazardous Materials Technician. He currently works in one of the busiest engine companies in Fort Worth. He has worked for Firehouse World in San Diego where he was an assistant instructor for FDNY Battalion Chief Salka's "Get Out Alive" H.O.T. class. You can contact Larry by e-mail at [email protected].


