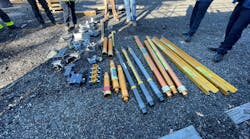
far enough apart to loop your anchor and place your connection point where needed.")
Over the last several years, I have been fortunate to be given the opportunity to travel as a fire service instructor, teaching on several topics. My favorite is rope rescue. My department is unique in that we can provide for a pretty substantial rope-rescue cache, but many more departments are not as lucky with their resources. This article is mainly for those under-resourced departments but also any first-arriving apparatus with limited staffing and equipment.
Bridging the gap
Whenever I find myself in front of a new class of firefighters, I start out by asking what types of rope-rescue calls they are are typically responding to and with what staffing and equipment. The general consensus is usually a low-angle operation, responding with three to five personnel, a bag of rope and some associated hardware.
This reality made me wonder how these dedicated responders could use what they learn in my class when they are back home. While I have the luxury of teaching rope rescue with the latest and greatest tools and toys out of a state-funded trailer sent from the fire academy, departments that can’t even afford compliant turnout gear are certainly not able to spend hundreds—if not thousands—of dollars on a new multi-purpose device (MPD) or Arachnipod. So the new question becomes, how do we bridge this gap between the classroom and actual departmental resources?
Having a state-sponsored academy or private company that can provide initial training is a blessing. This option relieves the department from the outlay of thousands of dollars in rescue equipment, yet they can still benefit from initial training.
Rope rescue can be an extremely expensive specialty to offer for a small department, and we have to be able to teach our responders the right way with the right equipment. Once we have gained proficiency in the basics—knots, anchors, raise/lower, etc.—then we can move on to what specific departments can hope to provide during day-to-day operations.
Starting from a solid foundation of basic knowledge, building systems with limited budget and equipment just requires a little creative thinking. It may seem overwhelming to try and correlate what we learn in class and apply it to a reality with much different resources. Indeed, quite a number of responders are hesitant to step outside of the boxes drawn by their classes. But the good news is that there are any number of ways to skin a cat; you just have to be willing to step outside the box.
Alternative solutions
If your funds and resources don’t allow for you to have everything in the rescue catalog, you need to find another way. Perhaps surprisingly, some of the less expensive methods are actually faster and easier than what you may have been taught in class.
A great example, in my mind, is anchoring solutions. We have all been taught about webbing (Wrap 3, Pull 2) and adjustable slings and straps, whereas I prefer to use the other end of the belay or descent line. Most classes glance over the tensionless hitch (usually until discussing tensioned high lines), but this can actually be a quick and effective solution:
- Use the end of your line to wrap your anchor five times.
- Secure the rope with a figure 8 knot and carabiner to itself.
- Place an eight on a bight where you want to attach your hardware and you have a proper anchor. In place of the tensionless hitch, you could also opt to tie two figure 8s (on a bight) far enough apart to loop your anchor and place your connection point where needed (Images 2 and 3).
These options utilize only a few feet of line and will decrease your system setup time. Remember, we are discussing rescues that are going to be of a low-angle. The majority of these rescues are going to be on a short, shallow, maybe muddy or loose slope. Responders should have most of the load on their feet, using the systems in place for assistance and safety. Rescue line is often purchased in pre-cut lengths. If your department has the standard 150-foot, 200-foot and 250-foot lengths of 12-mm line, you should have plenty to tie an anchor with and still effect a proper rescue.
By adding a few additional knots to the ones we find in IFSTA’s Essentials of Firefighting text, we can further whittle down the amount of equipment (and therefore cost) needed to begin to operate in a low-angle environment. The Munter hitch and the butterfly knot are taught in a lot of advanced classes, but are simple and effective to use on a daily basis.
The Munter
If the immediate priority upon responding is to have a rescuer securely lowered, you really cannot beat the Munter hitch (Image 4). The Munter hitch ties as fast as a Clove hitch, and only requires a stable anchor and carabiner to put into use. The breaking ability of the Munter is on par with the figure 8 descender or bar rack when we are utilizing it in the low-angle environment. As an added advantage, this particular hitch is reversible, making it an excellent safety belay for the ascending rescuer. For a smaller department, this knot is worth its weight in cost savings (free) versus an expensive descender. Key point: This knot should be limited to a one-person load. Your department standard operating guidelines (SOGs) will determine how and when this knot should be used. I prefer to use the Munter for lowering/belaying a rescuer for initial contact/triage or assisting with getting equipment down slope.
The Butterfly
This is another multi-use knot that is easy to tie and use. Originally designed to isolate a bad section of rope, it was quickly identified as a bi-directional replacement for the in-line figure 8. This knot does a great job as an in-line connection point for rescuers, equipment or to create additional attachment points for hardware (Image 5). Attachment points on a line that were built with either Prusiks or progress capture devices (PCGs) can be replaced with the butterfly. Key point: This knot is a stationary knot. You cannot utilize the Butterfly in situations that call for Prusiks or PCGs that must move.
Pulleys
One of the most difficult obstacles to overcome at any rescue is friction. Hopefully, however small your rescue cache is, it includes at least two pulleys. The reduction in physical effort that they provide far outweighs their minimal cost. Sure there are $100 pulleys on the market; that is not what I mean at all. I have found perfectly acceptable (meaning NFPA compliant) pulleys for less than $20. For that price, you could almost buy your own and keep it in your turnouts (I usually keep one in my bailout bag). The ability to build a mechanical advantage system relies heavily on them. A crew of three or four can provide great three-to-one mechanical advantage with just two small pulleys. This can translate into hundreds of pounds of pull/lift/stabilization. If you have more than enough staffing, pulleys can be replaced with carabiners, but I know of very few departments that can say they always have too many people on scene.
Back to the bridge
So with these few examples of using low-cost solutions, we are back to bridging our classroom learning with the resources at hand. The first resource is you. Individual or even departmental proficiency has nothing to do with department size or budget. Training, training, training is what gets the job done. If you are not willing to put in the time to practice the services you deliver, you will always be second best. If you are going to take the time to master a skill, then take the time to maintain that skill. During my years as an instructor, I often hear, “We don’t have this kind of equipment,” “Chief will never buy this for us” and “We never get the chance to use these skills anyway.” Instead of making excuses, this is the time to make it work!
Stop complaining about what you don’t have and start figuring out how to use what you do have. I honestly believe that a first-arriving crew (three or four personnel) with some rope, a couple carabiners, pulleys and Prusiks can build and utilize a low-angle system before EMS or the rescue (truck company) arrives on scene. The basics are already with us from the academy. I am sure that if companies had the minimum of equipment and took the time to learn some new knots, they would find themselves capable of an effective rescue/evacuation from a low-angle environment.
So what is the end result? Yes, there is money that needs to be spent for rope-rescue equipment. Your department will have to determine its own needs, but here’s my two cents: You can create/purchase an equipment cache capable of handling about 90 percent and put it in service for about $350 or $400. If your department is fortunate enough to be able to afford more, by all means improve your capabilities.
In sum
The public calls on us to provide a top-notch service when they need it the most—no ifs, ands or buts. They do not care what you do or do not have. They have called you in their time of need and expect a perfect response, every time. It is our responsibility to be ready and able to give them that, no excuses.