side. Notice that the roof is dented in, the first rescuer swimming to the car should tell the victims that he is going to dent the roof in. This provides a safer work area.")
After watching Hurricane Harvey pound Texas and Louisiana with unprecedented rain, flooding and probably thousands of rescues, an article on water rescue basics seems a bit underwhelming, but keep in mind that even in the biggest event, we rely on our basic skills.
Water rescue basics
In 2015, 176 people died in flooding in the United States, more than any other natural event. Further, 64 percent of the flood fatalities were vehicle-related. As water rescuers, we need to understand how to safely rescue victims from vehicles in floodwater.
Most often vehicles get caught in floodwater when the driver attempts to cross a flooded roadway. Cars float in very little water, so it’s no surprise what happens next. The variables we are most concerned with are buoyancy, vehicle surface area, and the depth and speed of the water. Most vehicles will be positively buoyant for a little while when the vehicle first enters as little as 18 inches of water.
The force of moving water is incredible. One cubic foot of water weighs 62.4 pounds, and when each cubic foot of water moving a few miles per hour hit something, there is powerful and relentless force.
A vehicle has a lot of surface area for water to push against, so combine buoyancy with current force on the wide surface of a car or truck and we have a very unstable situation. The current force is typically greater on the roadway (because the water picks up speed), and once the vehicle is pushed downstream 20 feet or so, it can settle in with the front of the vehicle pointing mostly upstream. Cars are leaky, and as water leaks in, it will get less buoyant and become more stable.
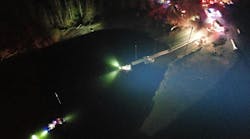
Size-up
Let’s size-up a hypothetical situation where we have a medium-sized car in a waterway. You are first on scene and see a car with two adults and possibly children inside. The windows are partially rolled up, and the car seems stable 20 feet from river right and 50 feet from river left. It’s at about a 45-degree angle with the front mostly upstream. Water is up on the hood.
First steps and critical factors
The first thing we want to know: Is the water rising, falling or staying the same? Water level changes let us know the time sensitivity of the situation. Place a marker at the water line on the road crossing as soon as possible and keep an eye on it. You will know what’s happening in about 20 minutes. If the water is rising, the force is increasing and this vehicle may roll at some point.
Hazards
What kinds of hazards are downstream? You need to get some downstream throw-baggers in strategic locations as soon as possible to be ready in case things go bad (view PDF diagram here). They should report the types and locations of hazards and the best direction to exit if rescuers end up swimming. For example: “Downstream to rescue, be advised, strainers and fencing on river left, safe eddy river right 100 yards downstream. Get right.”
Get an upstream spotter in position. This person can relay critical information like heavy debris floating toward the rescue site. They can also give a little warning on a sudden change in water level such as might be caused by a flash flood or a broken levy.
Make sure you have the right resources responding and assign a safety person to challenge the plan, to keep watching hazards, and to make sure everyone near the water is wearing a personal flotation device (PFD) and not wearing turnouts.
Establish contact with the victims
It is important to make contact with the victims if possible by yelling or using a PA system. Give them instructions and a simple system to respond, like thumbs up for yes or down for no. It’s not perfect but communicating around rushing water is difficult at best because sound seems louder for people in the water and quieter for people on shore. Remember any plan that includes victim participation is inherently weaker depending on what you ask them to do. They may seem to understand and then they do the opposite of what you asked. Be ready for that.
Stabilize the vehicle
Remember that a car starts out floating and it is often in a state of delicate equilibrium. The car may move or roll at any time if the water level rises with force and buoyancy increasing or you remove 400 pounds of people out of the car and make it lighter.
A simple stabilization line may make a big difference. If possible, let the victims know you are going to throw a rope to them. Explain that you want them to clip it around the steering wheel. Demonstrate clipping the carabiner on the throw bag back on the rope to make a cinch.
Don’t spend too much time on this; it either works or it doesn’t. If not, you can stabilize the vehicle once you get a rescuer out onto it.
The rescue plan
Water rescues are dynamic and things change quickly, so you need to form a solid plan B before you implement plan A. That’s a good rule to live by in water rescue.
Plan A
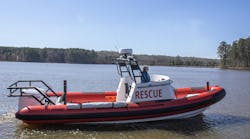
For the sake of argument, we will assume that the current volume is too big for a wading rescue. We effect rescues from low risk to high risk, which is Reach, Throw, Wade, Row, Go. Helicopters used to be considered the highest risk, but now most agree that an appropriate helicopter with qualified pilot and crew can be lower risk and faster than boats and “Go” rescues. So depending on your aircraft asset capabilities, it may be after “Wading” rescues or it may be after “Go” rescues.
If an inflatable rescue boat (IRB) with outboard is available, that’s probably the first choice. Have a quick rescue briefing to explain the plan and a backup plan as well as downstream hazards and safe zones. Bring extra PFDs for the victims and be sure that the boat crew has a couple of window-punches to break tempered glass.
The boat should approach from downstream and power up into the eddy formed by the vehicle (view PDF diagram here.) Keep station up against the car while the bowman climbs onto the car. Break out the back window and pass PFDs into the car and have the victims put them on. Now is a good time to stabilize the vehicle with a line from shore if it hasn’t already been done.
Once the vehicle stabilization line is on, bring victims into the boat one at a time. Don’t take more than two at a time in order to not overload the boat. The boat can take the victims to a safe shore and return for another load or the remaining rescuer if all victims are safe (view PDF diagram here).
Plan B
If there is no IRB, you can consider a boat on highline with a movable control point, but that is time-intensive. If it is deemed that the situation does not allow for the setup and use of a boat on highline, consider sending a strong swimmer to the car. It has been my experience that if water is only up to the top of the doors and the car is not moving, an experienced swiftwater technician can easily catch the eddy behind the car.
This is what water rescue technicians are trained for and it’s a very effective procedure. Pick your strong and confident swimmer. Set up downstream throw-baggers as a backup, and when all are ready and in position, send your swimmer to catch the eddy. Once in the eddy, climb up onto the car.
If the victims are inside the car, break out the back window and explain what you are going to do. The shore team can throw a rope to you, which will be the stabilization line. Secure it around the steering column or the B post, and it can be tied off as far upstream as possible.
It may be nice to have another rescuer swim out the same as the first. Two rescuers are better able to handle multiple victims. Once the rescuers are ready, send another throw bag over and use it to shuttle over PFDs for the victims.
Probably the easiest way to get the victims to the safe shore is to have the shore team pendulum a rescuer and victim to shore. This is a battle-proven technique. Have two or three rescuers hold the shore side of the rope, one rescuer to help vector the line in and three or four rescuers to catch the rescuer and victim.
When all are in position and signaling ready, the rescuer and victim will get into the eddy behind the car facing downstream. The rescuer must hold the rope with the hand farthest from the shore they want to go to in order to get a proper ferry angle, hold tight to the shoulder of the victims PFD and ride the current across.
An option is for the rescuer is to clip the pendulum line into live bait ring on a rescue vest. This adds a little more security but it’s best to still reach back and hold the line with the proper arm in order to set your ferry angle.
In sum
Statistically, rescuers are more likely to need to rescue victims from a vehicle than other swiftwater situations, so it makes sense to train for these situations. Lots of training in the water increases rescuers skills and confidence so when the real mission comes, it’s just like training—safe and effective.
Sidebar: Indian River Rescue School
This past summer, I had the opportunity to spend time with Indian River Rescue School in South Bend, IN, doing some of the best training I’ve done in a long time. They put on a very hands-on five-day class in the East Raceway of the St Joseph River. The East Raceway was constructed in the 1980 as a national kayak course, so they can control the water flow. They also put a car in the east raceway for each class, making for excellent training.
Indiana River Rescue School is administered by the South Bend Fire Department as a regional best practice training center. They are set up as a cost-neutral program, which means they are able to provide a very good instructor-to-student ratio (often one instructor for every three students). They also have a lot of top-quality resources and logistics management for the class.
Indiana River Rescue School has several open courses every year, and they train to NFPA 1006 knowledge and skill requirements.