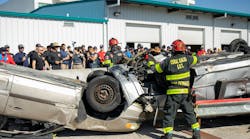
Many fire departments and rescue squads provide technical rescue services to their respective communities. One area that is very common to many organizations is motor vehicle extrication. While newspapers and other media outlets are constantly showing pictures of disentanglement actions, many do not realize the preparation and logistical work that goes into a successful extrication operation, especially with the changes to vehicle design, power, and construction that we are faced with today.
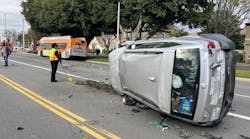
When we think extrication, we are really talking about disentanglement—the actual removal of the vehicle from around the victim. Removal, or extrication of the victim, comes after the disentanglement work on the vehicle. That will vary greatly, depending on the severity of the impact, and the composition of both materials that have been involved in the accident.

The extrication scene is a dynamic event; it is always changing and has the potential to go bad quickly. Therefore, I would be remiss not to emphasize the use of full PPE, including secondary eye protection above helmet shields, body substance isolation (BSI) equipment, turnout gear and crash gear for firefighters and EMTs, etc. Any disregard for the use of these basic protective ensemble components can lead to serious injury, and there is no excuse for it.
Initial size-up
The time to start your size-up is immediately at dispatch, NOT at the accident scene. A lot of information can be gathered by the dispatch assignment. For example, the type of road (residential street, highway) can provide clues on the speed of impact you can expect. The location of the area may provide information about what hazards may be involved, such as type of vehicle, industrial equipment (forklifts and construction vehicles have accidents, too) and access to the scene. Upon arrival, initial responders should be sent toward the wreckage and perform an inner circle survey of the incident. This is a total 360 walk-around of the incident, looking toward the wreckage, to help obtain some vital information about the incident. Take note of issues like the number of victims, doors locked or jammed, vehicles still running, leaking fluids or fuels (ALL types of fuels)

Additionally, identifying the type of vehicle involved in the extrication will help identify types of methods that will be used during operations, based on strong points of the vehicle for stabilization and disentanglement. Vehicles will range in size, horsepower rating, amenities, safety features and construction techniques. These construction types may include full-frame, unibody, and space-frame vehicles. The best way to tell on scene is to look underneath the vehicle to check for frame rails, and to see where they terminate. If there are no full-length frame rails, then expect unibody or space-frame construction.
While the inner circle survey is being done, another team of rescuers should be performing an outer circle survey as well. An outer circle survey is a complete walk around the entire accident scene, facing outward (away from the incident). These rescuers are looking for additional issues related to the incident, such as damaged buildings that need structural support, ejected victims, victims struck away from the incident, walking wounded victims, other vehicles involved in the accident, and utility damage. These situations may not be identified by the arriving crews, due to tunnel vision and focusing on the obvious victims. Do not fall victim to this trap and be sure to thoroughly survey when arriving on the accident scene.
Vehicle stabilization and glass removal
Now that we have identified some of the important points of the response and the on-scene size-up, it is imperative to stabilize the vehicle. Stabilization is the application of equipment and techniques designed to stop the vehicle from moving in any direction. We accomplish this by focusing our stabilization concerns in three different categories: 1) Horizontal stabilization involves stopping vehicular movement from front to back, which can employ chocking tires, deflating tires, putting the vehicle in park, and setting the parking brake; 2) Vertical stabilization stops vehicular movement up and down, by use of step chocks, box cribbing, and rescue struts; and 3) Interior stabilization includes putting the vehicle in park, shutting off the ignition, removing the key from the vehicle, rolling down all the windows, opening the trunk and hood when applicable, moving power seats back slowly, if capable, lifting tilt-wheel settings and moving electric pedals out of the way for the operation. This will require a rescuer to get into the vehicle and make patient contact, so be sure to provide both horizontal and vertical stabilization PRIOR to sending a rescuer into the vehicle for any reason.

It is imperative to get medically trained personnel into the vehicle to begin stabilizing the patient while the disentanglement takes place. The quickest method to achieve this is to remove the glass from a location furthest from the victim, so that any broken glass is kept far from the patient. Once the glass is compromised, all glass should be placed under the vehicle, when applicable. To do this, it is paramount to identify what type of glass is in the vehicle.
There are three basic types of glass in vehicles:
Tempered Glass is found most frequently in side and rear windows. It is single layer but stressed on the outer surface. This glass will shatter into small pieces when broken, so it is advisable to cover the glass with duct tape, spray adhesive or use sheets of adhesive paper so the glass can be collected and removed without exposing the victims to sharp edges. Rescue teams carry spring-loaded center punches to break this type of glass, but the point of a Halligan tool or any other pointed tool can work as well.
Laminated Glass is found most commonly in front windshields. This type of glass is constructed of polyvinyl butyral plastic sandwiched between two layers of glass. When this glass is broken, it will remain together as a unit but will crack and tear. This type of material can be removed with a variety of tools, such as an axe, a reciprocating saw, a pneumatic windshield saw, and even a hand saw.
Enhanced Protective Glass (EPG) is a newer class of laminated glass, located in side and rear window assemblies. These glass panels will react in a similar fashion as laminated windshields, as the construction methods are very similar. Most rescuers will attempt to attack the side and rear window panels as if they are constructed of tempered material, but two or three attempts with a center punch on these panels will yield little more than a few small marks in the window.
Now that it is time to displace some metal, a few safety points should be considered when deploying hydraulic extrication tools:
1. Do not position yourself between the tool and the vehicle. When the tool begins to displace metal, the tool can react and shift toward the vehicle. Once it pins the rescuer against the vehicle, serious injury can result.
2. Full PPE is a must. There will be flying glass dust, shards and splinters of metal, plastic and other materials reacting violently on the scene, and a rescuer can get injured quickly. There will also be the potential of exposure to bloodborne pathogens and body fluids; protect yourself against any potential injury and exposure.
3. Be aware of your surroundings. There will be plenty of activity around the rescue scene, and some actions will produce reactions that will have to be addressed (i.e., loose cribbing materials, tool proximity to patient, etc.).
Disentanglement techniques
Now that the vehicle has been stabilized and the necessary glass and metal have been removed, there are several Disentanglement Techniques that may be used.

Door removal
The rescuers begin the maneuver by setting purchase points in the most accessible area of the pin assembly. The tips are set into place, with the tool assembly just short of perpendicular to the door. This position will allow the outer spreader arm to displace the door in an outward fashion, fatiguing the striker pin assembly and causing it to fail. Once the striker pin assembly has failed, the tips are then placed near the bottom hinge, between the post and the door, to tear the door from the hinges.
Placing the spreader tips inside the hinge itself can cause the large hinge pin to fail, spreading the hinge assembly to the point of failure of the large hinge pin. Once the door is displaced, it may be necessary to cut any wiring that runs from the passenger compartment assembly into the door for power window, door locks and mirrors. Note: This example starts the displacement at the pin side of the door, but the evolution could begin at the hinge side of the door, based on accessibility on the accident scene.

Roof flap and removal
It may become necessary to provide more space to work around the patient for removal. One method to gain more room is to “flap” the roof. Rescuers utilizing the cutters will cut the “A” posts, as low to the dashboard area as possible. Once these posts are cut, it may be necessary to support the roof, so it does not drop down onto the patient. Horizontal relief cuts are then placed behind the patient, and in front of the “B” posts of the vehicle. A rigid pipe or suitable tool (Pike Pole, Wrecking Bar, pipe, etc.) is then placed across the roof at the relief cut location. Rescuers then lift on the front of the roof and “flap” the roof backwards. While this is a rapid method of gaining more space, there are some drawbacks: first, when this maneuver is performed on a high-speed roadway, the winds of passage from vehicles traveling past the incident can cause the roof to fold back down on the victim, and the rescuers.
It is advisable to tie the roof down to the rear of the vehicle. Secondly, the flap may not be feasible due to roof damage from roll-over incidents; in this case, rescuers are best served by removing the entire roof assembly. In this scenario, “A” posts, “B” posts, and “C” posts (four-door vehicles) are all cut as low as possible, and the entire roof assembly is lifted completely off the vehicle. While this will provide an enormous amount of room, more rescuers are needed to lift the assembly off the vehicle. If the scene is short on personnel, it may be safer to perform the roof flap. Lastly, consider new car technology that provides solar power sunroofs; the high voltage wiring will run down one of the rear posts, meaning it cannot be cut safely. In this case, leave the last post in tact and twist the roof horizontally off the vehicle.

Dashboard push
During frontal collisions, it is possible that the front/dashboard area can become displaced on top of the victim in the vehicle. In this scenario, it will be necessary to “push” the dashboard off the victim. Access to the vehicle’s rocker panel and “B” post assembly is a necessity. A hydraulic extension ram is placed between the “A” post and the “B” post in a diagonal position; the cylinder/base of the ram is placed at the bottom of the “B” post, while the traveling/extension end is placed on the “A” post, just below the top of the dashboard. It is more efficient to utilize two rams, one on each side of the vehicle, but if only one is available, then it should be placed on the side dictated by the medical needs of the victim.
Third-door procedure
Two-door vehicles have limitations when it comes to rear seat access. There are times when accessing a patient in the rear seat area will require some unconventional thinking. Normal access for passengers to pass between the “B” post and the front seat when getting to the rear seat will not work when removing an injured patient. Therefore, we need to make another access point or “third door” in the vehicle.

The first step is to access the rear panel and “B” post area by removing the front door from the Nader pin/door striker assembly. Once that is completed, the cutters are used to make four cuts in the panel area: rescuers cut the “B” post in two locations, one at the top of the post, and a parallel cut in the bottom of the post by the rocker channel. The next cut is made on a 45-degree angle, at the bottom left corner of the rear glass area for the rear seat. The last cut is made in the wheel well, connecting to the third cut that runs from the rear glass area. Once these cuts are made, the hydraulic spreaders are placed onto the “B” post, on a 45-degree angle, a few inches above the door latch area. Two rescuers clamp the spreaders onto the panel, and with an outward/downward motion, the panel is displaced to allow access to the rear seat area.
Full side removal
Four-door vehicles pose a stabilization problem for rescuers when it comes to patient care. Medical personnel may be required to manipulate cervical stabilization around a displaced “B” post in an accident. Furthermore, side-impact collisions may hinder access to center door striker assemblies and hinge areas on sedans. It may be best to remove the entire side of the vehicle in one maneuver.

Rescuers begin at the Nader pin/door striker assembly area for the rear door and displace the door from the connection. Next, the cutters are utilized to cut completely through the top of the “B” post, and to place a relief cut in the bottom of the “B” post, parallel to the rocker channel. Be sure to cut the seat belt so the belt does not hinder the removal of the post.
The next step requires the rescuers to place the spreader tips into the lower relief cut in the “B” post, and in an outward/upward direction, displace the “B” post from the vehicle. It will be necessary to support the rocker channel below the post to avoid pushing the channel assembly downward, instead of displacing the post. There have continually been debates about which cut to make first on the “B” post, the top cut or displace the relief cut. It has been my experience that the post displacement works much better when the top of the post is cut prior to displacement. After the post is displaced from the vehicle, rescuers can spread or cut the front-door hinges, removing the entire side panel assembly from the vehicle. Be sure to have some wire cutters on hand to cut any wiring for power accessories that may be in the door assemblies.
High-dash displacement
Front impact collisions can compound the problems found on the extrication scene. When two vehicles collide while traveling in opposite directions, the impact force can be increased exponentially. Moreover, high-speed frontal collisions have recently resulted in more footwell entanglements, including pedal entanglement and lower firewall intrusion with the patient’s lower extremities. Furthermore, when the vehicle is up against a stationary object, it will be very difficult to displace the dashboard and firewall assembly back off the occupants. In this case, the high-dash displacement is successful for disentanglement, as it will allow for displacement without driving the front of the vehicle downward, or into the object the vehicle is resting against.
To execute this maneuver, the doors on the patient’s side of the vehicle have already been removed, and the roof assembly may have been either rolled back or removed completely. Rescuers make two parallel cuts into the “A” post; one directly above the lower hinge, and one directly below the lower hinge. Two more cuts are crucial in performing this maneuver: one cut is made from the lower side of the front wheel well, just behind the center of the wheel well, and the other cut is made from the top of the fender area, just behind the shock absorber/strut tower. Note: There is a structural metal fender channel located in the vicinity of the top cut area, between the fender and the hood. It is vital that this channel is cut completely through, or the dashboard will not successfully displace.

Once these relief cuts have been made, the spreaders are used to first clamp onto the area between the two parallel cuts in the lower hinge area and bend the material out of the way. This will allow for a large purchase point for the spreader tips to be set into place. At this time, additional cribbing/support should be put in place below the “A” post, so the bottom of the channel does not displace. The spreaders are then opened slowly, being sure to keep the handle of the tool parallel with the ground, or slightly tilted upward; this will increase the tool’s capability to lift the dashboard upward, instead of deflecting the lower region of the “A” post outward. Lifting the “A” post will result in displacing the dashboard area, while pivoting the fender assembly at the relief cut in front of the strut tower.
Conclusion
The maneuvers described in this article are only the surface of potential displacement skills that can be performed on the extrication scene. It is highly recommended that emergency responders continually update their skills in the area of displacement techniques. Vehicle technology is continually changing, not only in passenger vehicles but in commercial vehicles as well. Some of these changes provide more safety for the occupants but serve as hazards for the responders who operate at these incidents. Identification of all hazards and application of current rescue skills are used in coordination with patient care for the most successful outcome on scene.
Until next time, stay focused and stay safe.