These are techniques to train on and keep in your mental slide tray for when you are faced with a similar situation.
As with passenger vehicle crashes, consider what the crash gives you as far as access upon your arrival. Also, look for open doors, windows or even roof hatches first. Many times, the occupants of the school bus will give you an opening. With manufactured emergency openings, children are trained during evacuation drills on how to get out. If these openings are damaged, obstructed or you need another opening, some of the techniques we will discuss may be needed.
Being a professional tool operator
As firefighters, we really should think, train and operate with the mentality that we are professional tool operators. School bus extrication may require a variety of tools that are on your engine or rescue. From experience, the tool of choice for cutting through the side wall, roof and many other parts of a school bus is the reciprocating saw. The saws on the market today, whether corded or battery powered, are faster and more powerful than previous generations. They can throw sparks, but much fewer than other cutting options. Along with the reciprocating saw, blade choice is important as well. There are many different brands of metal cutting blades on the market that work well, however, they can dull quickly. It is recommended to use a carbide-tip metal-cutting blade, which will last much longer. Also, use 9-inch blades due to the thickness of the school bus body (this is a pretty common size for all extrication).
You may wonder about using other cutting saws such as a K12 or circular saw. We have used K12s in training and they are loud and throw lots of sparks that bounce around and deflect around the inside of the passenger compartment. For this reason, it’s not a recommended saw, especially when the school bus has occupants on it that need rescue. Some smaller circular saws are a viable option, but blade depth can be an issue depending on where you are cutting on the school bus. Some circular saws will throw more sparks than a reciprocating saw but testing blades can help you find a good option.
Air chisels have their place in school bus extrication, just like in passenger vehicle extrication. You may be limited by the amount of air you have and can get quickly for extended cutting, but for cutting hinges, metal panels on the side or roof, and hard to get finish cuts, chisels are a great option.
Many other tools and equipment such as—but not limited to—cribbing, hydraulics, airbags, hand tools, chains, chain or cable come-alongs and ladders may come into play. As a professional tool operator, it is up to you to know what is on your apparatus and to know how to use it.
Steering column displacement
There are major differences in the steering columns of different school bus types and displacement techniques are critical for success. Additionally, there are several different options to complete steering column and dash displacement in each. The two biggest differences in school bus steering column anatomy involve Type C and Type D school buses.
Type C school buses have the engine and front steering wheels in the front of the main entrance door. This resembles a passenger vehicle, however, everything is bigger in size. The steering column itself goes through the firewall just like a passenger vehicle. Think for a minute how you would displace the steering column and dash on a passenger vehicle.
Type D school buses resemble city charter buses where the main entrance door is in front of the front steering wheels. The engine could be to the right of the driver, partially below the floor or in the rear of the bus. The steering column goes through the floor, not the firewall. Realize in the Type D school bus, displacing the steering column will not move the dash as you might expect in passenger vehicles.
So, as far as techniques to displace the steering column in Type C buses, you can use hydraulic spreaders laying on the engine compartment hood to pull a chain hooked to the bumper, frame or tow hooks and another around the steering column. A chain hoist, connected in the same way as described when using the spreaders, is another option as is a ram to push the A post, or even a heavy wrecker that is available to hold the frame stationary and pull the steering column with its cable.
In Type D school buses, we need to vary the displacement techniques because the steering column goes through the floor and there is no engine compartment hood. The first thing to realize is that pushing the A post or dashboard will not move the steering column like it would in a Type C bus or passenger vehicle. Pushing the dash will potentially gain more space, however, the steering column is a different bone in the school bus anatomy. Next, tool placement for pulling the steering column is different due to that flat face of the Type D school bus. To pull the steering column, several blocks of cribbing (i.e. 4 x 4s) will be needed to get an outward angle pull with hydraulic spreaders or a chain hoist. If using hydraulic spreaders, ensure that the arms of the spreaders stay in line and do not torque off their centerline, which could cause tool failure and/or potential injury to rescuers.
Sidewall access
If an opening in the sidewall of the school bus is needed for access, victim removal or getting equipment in is needed, this technique will require more time than expected because of the multiple layers and thicknesses of metal. The situation will dictate whether you need a single-window width opening, double-window width opening, or maybe just a single window cut down to seat level. If you are removing the entire side wall down to the floor, realize you will need to get rid of the seat that is attached to the inner sidewall.


Another consideration is the angle of your cut, which applies to many different extrication scenarios. If you want metal to move in a certain direction, make sure you think about how you are holding your tool.
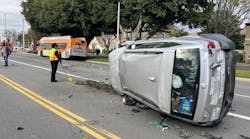
Roof access
When faced with a school bus on its side, you may need to make additional openings. If you need to cut an opening, you can do it quickly with a striking tool, reciprocating saw and/or a chisel. There are typically two stringers running front to back of the bus on the roof and bows that correspond with window posts. Many times these thicker roof supports can be identified with visible rivets. Try to avoid these structural supports as there will be less metal to cut.
A purchase point through the outer and inner sheet metal will give you a good purchase point for a reciprocating blade. Also, an air chisel can make pretty quick work of the sheet metal between all the roof structural stringers and bows.
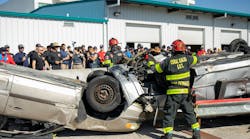
Rollover pinning
Rollover pinning could happen anywhere. Think about how many times you’ve heard about a person who was partially ejected from a passenger vehicle and ended up pinned under the vehicle. These rescues should be fast. Now think about a school bus rollover scenario where a child gets ejected from a window and becomes pinned. Is it possible? You bet. This scenario could happen anywhere on any day.

One specific tool that can make quick work of this scenario is the high-lift jack. A purchase point with a striking tool through both the outer and inner roof sheet metal below the bottom stringer will provide an excellent spot to insert the high-lift jack runner (part of the jack where the load is lifted). One jack can make the lift, but two makes for an easier lift. If using two jacks, be sure to coordinate the operation. As with any lift, crib as you go to prevent the load from falling back on the victim. High-lift jacks are a fast option for lifting because set-up is easy and they always start. Be sure to train on their operations to understand the limitations and hazards of not controlling the handle when the jack is loaded.