truss —
A framework of triangulated forms in which all loads are carried by compression or tension in each member of the frame.
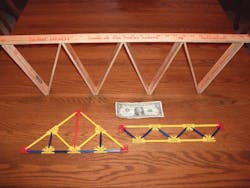
I will now introduce you to three simple and effective tools that will demonstrate to your fire officers and firefighters how a truss works. Photo 5 shows my yardstick truss and two trusses assembled using a child's construction toy called K'Nex (www.knex.com).
K'Nex Trusses as Training Tools
I recommend you buy individual pieces rather than invest in a prepackaged K'Nex set. For example, I ordered enough individual pieces to create 30 student activity "kits." Each kit has enough pieces to assemble one triangular and one flat truss. I store the pieces for each kit in plastic freezer bags. Each kit costs about $4. I have students first assemble the triangular truss, disassemble and use the same pieces to assemble the flat truss. I recommend tossing in a few extra rods and connectors into each kit.
During your presentation, guide and discuss step-by-step assembly so that students experience the structure getting stronger and more rigid as geometry is added. (Let me know if you figure out how to assemble an arch truss.) During your presentation, emphasize that trusses are not dangerous; rather, trusses are unthinking, unaware, inanimate objects. Instead, encourage firefighters to understand and respect trusses for the engineering marvels that they are. Trusses cause harm only when they are not identified and not factored by fire officers.
• K'Nex triangular truss — Start with the K'Nex triangular truss. Have students build the simple, single-panel truss shown in photo 8. Have students twist, squeeze and manipulate the truss. Ask students to identify the weakest part of this truss. They should identify the center of the truss.
Ask students how to make the single-panel truss stronger and more rigid, with the following four conditions:
- The length of the truss (heel to heel) must stay the same.
- The depth of the truss must stay the same.
- No piece of the truss can increase in mass.
- Use only the remaining contents of the K'Nex kit.
Given those conditions, the only option is to add geometry by adding pieces between the top and bottom chords.
Have students add a kingpost (the vertical red rod shown in photo 9). Discuss how this two-panel truss is somewhat stronger but still offers little structural value. Before adding more pieces, have students disconnect the king post from the bottom chord panel point. Simulate truss loading by artificially stressing the truss at the heels. Ask students, if still connected to the bottom chord, would the king post be in tension (pulled down) or in compression (pushed up).
Photos 10 and 11 show evidence (strain) that the bottom chord panel point would be pulling down on the king post; thus, the king post would be in tension. Ask students what would happen if a column were positioned under the same panel point, thus resisting the pulling force. (Answer: The king post would be in compression.) Reconnect the bottom chord panel point and disconnect a top chord panel point. Again, apply stress and notice that the king post is pulled down by the bottom chord panel point, further evidence that, if still connected, the king post would be pulled into tension.
After reconnecting the king post to the bottom chord, ask students to identify where the weakness is now; students will identify that the weakness is now between the kingpost and the heels. To resolve this weakness, add a diagonal web member (yellow rod) to each side of the king post (photo 12). Again, have students manipulate the truss and discuss the increased strength and rigidity. Students will identify two remaining weak spots along the bottom chord. Ask students how to resolve this weakness.
The bottom chord weakness can be resolved by adding two vertical blue rod web members (photo 13). Ask students to manipulate the finished truss (twist, squeeze, stress) and discuss how strong and rigid the truss has become although — this is important to emphasize — no piece of the truss got bigger; in other words, pieces were added, but the mass of the truss did not change.
Have students disconnect a diagonal yellow web member from the top chord panel point as shown in photo 14. After having students stress the truss, ask if the yellow web member would be in tension or compression (if still connected). The visible strain provides evidence that the yellow web member would be in compression. Inform students that they will occasionally hear web members referred to as "struts" (compression) and "ties" (tension). Students will also find truss diagrams that show compressive web members drawn as bold lines and tensile web members drawn as thin lines.
IMPORTANT CONCEPT: Students have just revealed (and demonstrated) the magic of lightweight truss construction. Increased strength and rigidity was the result of adding pieces that created geometry (triangles), not by increasing the dimension of the pieces. Remind students that to support more load or to increase clear span legacy conventional construction required making things bigger and relying on compression.
• K'Nex flat truss (parallel chord truss) — Have students assemble the trapezoid shown in photo 15.
For the photos 15-20 for this article, please use this link: http://www.firehouse.com/stateprovince/other/truss-truce-part-3-remaining-photos
As students manipulate (twist, squeeze) the trapezoid, discuss whether there is any structural value. Students will quickly recognize that the four-sided structure is weak and unstable and has no structural value.
Now have students triangulate the trapezoid using blue rods (photo 16). As students manipulate the five-panel truss, they will quickly recognize that it is rigid, stable and strong. Although the truss is more rigid and much stronger than the trapezoid, no piece of the structure got bigger (legacy, conventional thinking); instead, more pieces were added to create triangles (contemporary, lightweight thinking).
Now have students disconnect a panel point anywhere along the top chord. Have them simulate the forces that would stress and strain the truss should a heavy load be applied (photo 17). Point out that the top chord strain at the disconnected panel point is pushing/shortening; thus, the stress is compression.
After reconnecting the top chord, have students disconnect a panel point anywhere along the bottom chord. Again, have them "load" the truss. Students should observe that the bottom chord strain is lengthening/pulling, thus the stress is tension (photo 18).
Finally, ask students how to make the truss stronger and more rigid. Remind them that the length can't change, the depth of the truss can't change, and no piece can get bigger. The secret is to add additional triangles (shown by the vertical orange lines shown in photo 19). Again, emphasize that this additional triangulation decreases the effective length of the top and bottom chords.
The Yardstick Truss
Not only is my yardstick truss an interesting training tool, it is cheap, portable, and reliable. To assemble the yardstick truss you'll need three yardsticks, a saw, one hot glue gun, some string, one nail, and a quarter-inch drill. The purpose of the Yardstick Truss is to demonstrate the importance of the bottom chord. Granted the yardstick truss is not "engineered," but it is dramatic.
Yardstick truss anatomy (photo 20):
• One 30-inch top chord
• Eight nine-inch web members
• Five hot-glue panel points (spaced seven inches apart)
• Three or four feet of quarter-inch string
• One finishing-type nail
• Four to six 10-pound weightlifting plates
For the photos 21-25 for this article, please use this link: http://www.firehouse.com/stateprovince/other/truss-truce-part-3-photos-20-25
To assemble the yardstick truss (photo 21):
- While maintaining a one-inch overhang at each end, use a pencil to mark each of the seven-inch panel points.
- Drill a quarter-inch hole at each end of the top chord (in the middle of each one-inch overhang at the ends).
- Use the hot glue gun to connect the web members at the panel points. (The panel points don't require a lot of glue.)
- At one end secure the string with a knot tied around a nail (so the string can't pull through) as shown in photo 22.
- To serve as the bottom chord, stretch the string along the bottom of the truss and through the hole at the opposite end.
- Pull the string into tension so that the top chord deflects (arches) slightly upward (depending on mass and rigidity of yardstick, about a two- to three-inch top chord camber as shown in photo 23.)
- While holding tension to maintain the top chord deflection, secure the opposite end by wrapping the string two or three times and securing with a non-slip knot (the knot doesn't have to be fancy). Pre-stressing a slight arch in the top chord will ensure that the top chord flattens when loaded; when loaded, the bottom of the web members should rest on the string. (Again, see photo 23.)
- Do not hot-glue the string to the bottom of the web members!
Prepare for the Big Event
- Using the backs of two chairs (or the edge of two tables) to support each end of the top chord, position the truss between the chairs.
- To protect the floor when the weight plates fall, place a folded floor mat or flattened boxes under the truss.
- The truss should easily support 40 pounds (the truss shown in the photos could have supported 60 pounds).
Load the top chord with 40 pounds (photo 24). Make sure the plates are positioned gently (minimize impact) and distribute the load as much as possible. (I don't recommend concentrating the plates in the center of the top chord.) Keeping toes and feet clear, use a butane lighter to heat the bottom chord. The resulting failure is pretty cool. Although the truss shown could have easily supported 60 pounds, it's better to be conservative so the truss doesn't fail because of overloading.
IMPORTANT CONCEPT: Using a separate 30-inch yardstick (pre-cut for a future truss), position the yardstick (flat, not on edge) as a simple beam bridging the span between the chairs. Ask students: Could the 30-inch yardstick simple beam support 40 pounds? (Of course, the answer is no, it couldn't support 10 pounds.) Now ask: The 30-inch simple beam bridge must support 40 pounds. What are your options?
There are a few options: inserting columns to turn the simple beam into a continuous beam; make the beam deeper (increasing the mass, like a header); turn the yardstick on edge and add adjacent on-edge yardsticks to share (distribute) the load; suspend the center of the beam with a cable or steel rod (as shown on page 98 of the September 2009 issue of Firehouse®); use a steel I-beam; or some combination of the first four options. Remind students that the best option is to replace the beam with the yardstick truss.
Call to Action
A marine biologist who has studied and understands shark behavior does not consider a shark to be an "evil" monster or a vocational "enemy." To the informed marine biologist, a shark is simply an interesting fish. However, because marine biologists respect the power and grace of sharks, they would not do something stupid that would make them vulnerable to shark attack. Likewise, fire officers who understand the grace, power and behavior of trusses do not consider them evil. Trusses are incapable of thinking; trusses are not aware. On the fireground, fire officers are capable of thinking and making decisions. Fire officers must understand truss behavior, identify and factor the presence of lightweight construction, determine who and what has the most value, and make appropriate decisions.
A truss is an assembly of pieces that are engineered to resist dead and live loads; nothing more and nothing less. Trusses are not evil predators that hunger for firefighter prey; trusses are predictable, trusses are reliable. Fire officers are not nearly as predictable or reliable as a truss. Trusses have been around since the Roman Empire, so they aren't going away any time soon.
Should wood trusses become involved in fire (or steel trusses exposed to high heat) the master craftsman fire officer — an informed strategist — will recognize and factor this hazard and the risk will not be ignored. Your call to action is to acknowledge that you do not possess magical powers that make you invincible.
Your final call to action is to ensure that your firefighters will not be harmed because you did not understand the principles of building construction, and in particular the behavior of lightweight structural components once they are exposed to heat — including glued-together wood I-joists.
The informed strategist acknowledges that when the failure of a truss harms a firefighter it's not because the truss is evil. It's not because fire is evil. It's not because gravity is evil. It is because a fire officer allowed the firefighter to be there where and when the truss failed — or worse, didn't know where the firefighter was, what he was doing, and why he was there. Make sure your firefighters aren't there when and where it happens in your community.
It is human nature to fear what you don't understand. Once you understand the miracle of the truss, you will discover that they are pretty cool. Have you hugged a truss today?
Share your buildings! Do you have an interesting or dangerous building in your jurisdiction? Firehouse® invites you to share your building with our community by e-mailing building information and, if possible, JPG images to [email protected]. Don't forget to include your name, rank, fire department, location and a description of the building. It is possible your building will be profiled in a future edition of Firehouse® Magazine.
MARK EMERY, EFO, is a shift battalion chief with the Woodinville, WA, Fire & Life Safety District. He is a graduate of the National Fire Academy's Executive Fire Officer program and an NFA instructor specialist. Emery received a bachelor of arts degree from California State University at Long Beach and is a partner with Fire Command Seattle LLC in King County, WA. He is in no way affiliated with or an advocate for the truss manufacturing or building construction industries. He may be contacted at [email protected] or access his website www.competentcommand.com.
For the photos 15-20 for this article, please use this link: http://www.firehouse.com/stateprovince/other/truss-truce-part-3-remaining-photos
For the photos 21-25 for this article, please use this link: http://www.firehouse.com/stateprovince/other/truss-truce-part-3-photos-20-25
