Nylon webbing is a tool that can be used for many different operations and really should be carried by each member on the apparatus.
Nylon tubular webbing is a tool that can not be over stated. This tool can be used for many different operations and really should be carried by each member on the apparatus.
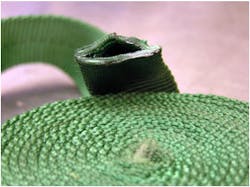
There is flat webbing and tubular webbing. Flat webbing is like a seat belt, a single strip of webbing. Tubular webbing (see photo 1) on the other hand comes in two types, Edge stitched and Shuttle Loom. For Edge Stitching, a flat piece of webbing is folded over on itself and sewn together. Shuttle Loom is constructed by using one piece of "Thread" and weaving it on to a tube. Shuttle Loom is also know as the Spiral Weave and is traditionally the preferred webbing for high angle operations. There are many, many types of webbing sizes and types; many should not be used for life saving applications. Do not buy anything unless you can identify its tinsel breaking strength, type of material, and manufactured date. For example, avoid using surplus webbing.
Setting it up for Rapid Deployment
Each member should have 24 feet of webbing tied with a water knot to create a continuous loop (see photo 2). Twenty-four feet of webbing, tied in to a loop, will give us the proper amount needed to perform most tasks associated with this tool. One-inch nylon tubular webbing has an approximate breaking strength of 4000 pounds and when tied in a loop, the knotted strength is approximately 3000 pounds.
Webbing should be inspected with your regular tools but at least monthly and after each use, and it can be cleaned with a mild soap and water. In essence, give the webbing the same care you give your ropes. It should also be noted that webbing does not respond as well as rope to shock loading, and should be protected from fiction heat when used over an edge. Webbing is not that expensive in the large scheme of things and my recommendation would be, use it one time for anything and replace it. Someone's life may depend on it.
The purpose of carrying webbing is not to use it like your utility rope, to haul or drag tools or hose; it is used for life saving reasons. We are not talking about weaving a person in to a basket, we're talking about a member that is in a hazardous environment: he's down and needs rescue. NOW! This is not the "touchy feely" part of the job, this is "old school" firefighting. We are not throwing caution to the wind; we are getting our brother or sister the hell outta there. NOW! Anyhow, the politically correct version of what I am saying is: Spinal immobilization may not be possible due to the need for immediate removal of the member from an imminently dangerous situation. That's what we're using this for: Saving lives.
Carrying Options
There are several ways to carry your webbing. You can make a daisy chain and carry it in your pocket. It keeps the webbing from tangling and comes apart easily. (Follow steps below, along with photos in slideshow.)
- Hold the webbing in your hand with the bite away from your body (see photo 3A)
- Tie a loop in the webbing with a slip knot (see photo 3B)
- Create another bite and pass it through the loop as shown in photos 3C and 3D
- Take another bite and pass it through the loop again as shows in photos 3E and 3F.
- Continue to pass the bites through the new loops until your webbing is "chained" completely. (see photo 3G)
You can also roll it on to itself and keep it in an examination glove (see photo 4) with a small piece sticking out and keep it in your pocket too.
A third option to carry webbing is by keeping it in your knee pad, if you have removable pads. Peel the pad down and "weave" the webbing up and down inside the pad (see photo 5) and when you reattach the pad properly, leaving a small piece sticking out so you can grab it with gloves on. This method actually gives you more knee protection and is not uncomfortable at all. I have used my webbing quite often and having it right at my disposal makes it a useful tool when it's needed and no one is fumbling around trying to get one. It's on the spot.
Firefighter Rescue Techniques
To take a 24-foot piece of webbing and use it as a harness to pick someone up is not a difficult task at all. Try this standing up; without turnout gear first, until you get the hang of it, then try this with turnouts, then with a member lying on the ground and last, have a member lying on the ground, full turnout gear and SCBA. It will take a little practice, but as you will see, if you need this maneuver you will be in the game making an impact immediately, not waiting for equipment while your brother or sister is lying in wait.
Seat Harness
- Place the webbing over your shoulder for control. (see photo 7)
- Take the knot of the webbing and pass it between the legs of the person being lifted or, as we will now call him the lift-e. (see photo 8)
- Reach around and grab the knot in the lower part of the back of lift-e. Now separate the two sides of the webbing and pull it around to the front of the lift-e. (see photo 9)
- Reach through the loops, grab webbing off your chest and pull it back through the loops. Take all the slack out and you have a seat harness. (see photo 9)
The seat harness can be used accordingly, lets say a person is conscious and you can not wait for a real seat harness, and it's not a long haul. But the truth is, if a person slips or goes unconscious and flips over, they are coming out of the harness, you hope. The last thing you want is anyone dangling from the end of anything! And you know the cameras are going to catch that one.
Hasty Harness
The Hasty Harness can be used in addition to the Seat Harness for a more secure harness. Following the above steps for the Seat Harness, continue with steps below.
- Once you tighten up the seat Harness, take the large loops in your hand and put the lift-e's arms through them. (see photo 10)
- Now move around to the rear of the lift-e and tighten up the harness. (see photo 11A)
- Once secure, tie two overhand knot's in the webbing and attach a carabiner for a lift point. (see photos 11B and 11C)
As you can see in photo 11D, when done properly even a limp human will not slip out of the harness.
By the time you finish this up, the members you notified when you gave the mayday upon finding the downed firefighter, will be in place for further orders and ready to execute the next step of your plan. I know you have one: It's the way you're trained to think. For every action, there is a consequence. You thought it through the consequence, and know how the plan is going to play out. The brother's that are there to assist will follow a plan, no matter who is explaining it, if it's a plan, the brother's will follow it.
The Chocker Hitch
Another way to grab someone is the chocker hitch, which is a quick means of dragging a downed member to safety.
- Wrap the webbing around the person's chest and pass the webbing through the loop and pull. (see photos 12A through 12C)
A Chocker Hitch is OK, but if the person being pulled raises their arms it can cause problems and possibly slip off. Practice with this, its easy and has some practical use. After you apply the chocker hitch you can drag the person to safety, this is not a lifting hitch.
Did I mention you should have a carabiner with you? Clip a carabiner to your gear in an easily accessible spot. The webbing and carabiner are a team, like the axe and the halligan. Sure, you can use them separately, but as a team they perform quite well. As with the webbing, do not get a cheesy carabiner. Make sure it's rated for what you want, life support. Whether you get locking or non-locking is up to you.
My preference is: for high angle, confined space, etc., use the locking carabiner and for the stuff I am talking about now, I use a non-locking carabiner, I feel I don't have the time to fiddle around with the lock in a "grab and go" situation.
In photo 14 another variation is to clip the carabiner to the SCBA wire assembly harness and the clip the webbing into the carabiner. Sometimes it's just easier to slap a carabiner on to the SCBA assembly than wrapping the webbing around the member's chest. If your doing this, make sure the SCBA is either converted to a harness or the assembly is tight to the victim.
Use a Mechanical Advantage When Possible
I will finish off with just one more way to drag a member. If you have a large member down, you can create a 2-to-1 mechanical advantage with your carabiner and webbing.
- If you're wearing a harness, attach one side of the webbing to the large rappel hook on your harness and the carabiner to the members SCBA harness. (see photo 15A)
- Thread the webbing through the carabiner and move away from the member to the maximum length of the webbing. (see photo 15B)
When you are pulling on the webbing it will slide through the carabiner creating a mechanical advantage. For example, if you needed 200 pounds of force to move this person and you are using this method, you need only apply 100 pounds of force because you now have a 2-to-1 advantage. (see photo 15C)
As with all procedures, practice makes perfect. You will need to practice this over and over again to become proficient at any of these procedures. Keep on drilling!
Captain Tony Tricarico has been a member of the fire service since 1977 and was hired by the FDNY in 1981. Tony has served in the South Bronx, Brooklyn and Manhattan. Since 2002 he has been assigned to the Special Operations Command and currently serves as Captain of Squad 252.
Tony is a nationally certified instructor as well as a New York State Certified Fire Instructor, is an adjunct instructor at the FDNY Technical Rescue School, a Deputy Chief Instructor at the Suffolk County Fire Academy, and additionally instructs and lectures throughout the country on a Engine, Truck, RIT and Special Operations tactics and procedures. He has been featured in FETN and American Heat training video's on collapse, elevator operations and SCBA emergencies. He is an active member of the Mount Sinai Volunteer Fire Department on Long Island and a former Chief of Department.


