A Systematic Approach to Standpipe Operations
Low-frequency/high-risk events present the most dangerous and challenging alarms for the officer. For most departments, high-rise events fall into this category. Starting the alarm off right gives crews the best chance of a successful operation. The decisions that are made early in these alarms either allow the alarm to progress smoothly or start the snowball rolling that can lead to tragedy.
Mike Tyson said, “Everybody has a plan until they get punched in the mouth.” It’s important that your crews can overcome the first punch of the alarm. Every department does things its own way. Riding assignments and tools vary. The order of operations: It should be the same.
Designing a system
The best time to ensure that the alarm goes smoothly is before the alarm is dispatched. Most departments have some kind of high-rise standard operating procedure. Is yours up to snuff? Reach out to other departments, preferably to ones that make high-rise responses and have similar staffing numbers as your department. Then, set up a few scenarios with the different systems that were shared by other departments to see which one works best for you. Mixing and matching of different systems is acceptable, but make sure that you have a deep understanding of the various systems; deletion of one part of a system might have unwanted consequences that might take time or experience to expose.
The Wichita, KS, Fire Department (WFD) uses the system that’s advocated by Chief Dave McGrail of the Denver Fire Department. Denver’s staffing numbers are similar to that of Wichita’s. McGrail has been a great resource, helping the WFD multiple times, from the initial training to questions that arose later.
The WFD gets regular fire duty, but when it comes to working high-rise alarms, crews only make a handful per year. Despite the alarms and regular practice, it still can be challenging at 3 a.m. to remember each riding assignment. As a result, crews often incorporate a quick reference card that lists their tool assignment and a brief description of their job. A card that takes 15 seconds to read can unlock the memories of all of the training in high-rise firefighting that the crews received.The rabbit crew
For first-engine officers to get the line in the right place, they must receive factual information from several sources. A rabbit crew can be a key part of the high-rise response by providing the first-due engine and the incident commander (IC) valuable reconnaissance information. Often filled by a truck company, the rabbit crew reports to the lobby of the high-rise and collects information from the enunciator panel, building representatives and/or bystanders. While this occurs, the engine company gathers the necessary equipment and stands fast for direction.
Based on information that’s gathered in the lobby, the rabbit crew then can make an educated guess on which stairwell to use for fire attack and begin its ascent. On each floor, the crew should check the standpipe outlets for caps and closed valves as well as open the door to examine each floor. Any missing caps or open valves should be dealt with if possible.
The floors must be checked for smoke, because it isn’t uncommon for smoke from a lower floor to travel up the pipe chase and be reported as a fire that’s burning on an upper floor.
In addition, the floor plan of the building should be examined, because a majority of residential high-rises stack apartment numbers, with similar apartment layouts, on the second floor and above. This allows the rabbit crew to get an approximate location of the fire apartment or fire room as early as the second floor and move to the closest stairwell on a clean floor.It’s critically important that the rabbit crew designates an attack stairwell and an evacuation stairwell. If stairwell designations are changed, the IC and all operating crews must be alerted.
In general, the stairwell that’s closest to the fire apartment will be the attack stairwell. However, there are a few additional factors that the rabbit crew officer must consider, such as the location of the standpipe, presence of pressure reducing valves (PRVs)/pressure regulating devices (PRDs) and presence of a roof hatch.
After the rabbit crew designates the stairwell, it should drop any equipment that’s needed by the ascending engine, such as extra hose sections, on the floor below the fire. It should then check the conditions on the fire floor to advise the engine company and the IC on the type of hose stretch that’s required. In most cases, a clean fire floor allows the engine to stretch dry to the fire apartment, ensuring that enough working line is in the hall to cover the fire area.
If the stairwell door is opened and smoke is encountered in the public hallway, you should assume that the door to the fire apartment is opened and that the line must be charged in the stairwell. When making the call on the type of stretch that’s required, the rabbit crew must take into account the reflex time of getting the hose in place and anticipate the changes that might occur in fire floor conditions during that time.
Once the attack stairwell is determined by the rabbit crew, the first-due engine can start its climb or cross over to the appropriate stairs, depending on the department’s standard operating procedure.Overcoming obstacles
When utilizing a standpipe system, there often can be problems with the system, ranging from minor annoyances to complete system failure. Members must be trained to quickly identify system problems and to rapidly overcome those problems. In addition, a well-stocked high-rise equipment bag must be available as the means to overcome these obstacles.
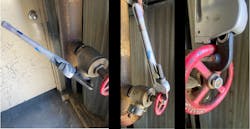
One such common occurrence that can foil a good high-rise operation is a standpipe valve that won’t open. Two things that will help to overcome this are an 18-inch aluminum pipe wrench and a 2½-inch gate valve. The pipe wrench can be used to remove an extremely tight cap, to turn a stem that lacks the wheel and to provide leverage to turn a handle that is too tight for it to be turned by hand.
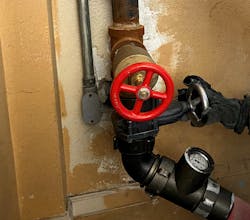
To minimize the chances of breaking off a stem when I encounter a stuck standpipe wheel, I like to go through a standardized progression. Before attempting to open the standpipe, the gate valve should be applied to the outlet. It’s common for these valves to only open one time, because of age or lack of maintenance, so if you get it open, it’s best to leave the building’s valve alone and use the gate valve for the rest of the alarm.
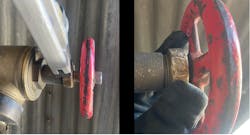
Of course, you should try to open by hand first. If the handle won’t open, don’t go for extra leverage right away. Check the packing nut on the stem. When systems are tested or charged, the dry packing seal will leak, and building personnel often crank down on the stem packing nut, compressing the seal against the stem. This stops the leak but also makes the stem extremely difficult to turn. Use the 18-inch aluminum pipe wrench that’s in the high-rise bag to loosen the packing nut until it’s finger tight. Again, try to turn the wheel by hand. If the valve still won’t turn, it’s time to go for more leverage.Stick the jaws of the pipe wrench into the openings of the wheel and turn the valve. Once the valve opens, allow it to flush until clear, then close the applied gate and apply an elbow(s) if needed and a pressure gauge.
If the problem is a stuck valve, the outlet that’s two floors below the fire floor should be tried. If that valve is good, crews can add a section of hose and operate as normal. Connecting two floors below to overcome a valve failure is the same operation as getting a second line into service off of a standpipe. You need one extra section to make up the distance from two floors below to the fire floor.
When it comes to getting a second line, it might be tempting to connect to the same outlet using some type of wye, but not only does the wye add weight to your high-rise bag, but each outlet is only designed to provide 250 gpm. Adding the extra section of hose and connecting two floors below ensure that you have the proper fire flow from each line.
Another common problem is the presence of PRVs or PRDs. The mere presence of a PRV/PRD isn’t technically a failure as long as it is set correctly or can be overcome. The necessary tools, including Allen wrenches, an adjusting rod and screwdrivers, to overcome an incorrectly adjusted PRV/PRD must be in the high-rise bag. These tools can adjust or remove a PRV/PRD to allow full flow from the outlet.
Supply and system failures
If the fire department connection on the building is the problem, the company that supplies the standpipe can attempt to connect to a valve on the lowest floor. Keep in mind, not all first floors in high-rise buildings have standpipe outlets. If the outlet has a PRV/PRD, crews might not be able to supply the standpipe using the outlet as an inlet. This situation necessitates that the water supply crew creates its own standpipe.
One of the absolute worst things that can occur and derail the operation is a failure of the standpipe itself. In the event of a full failure of the standpipe or should members be unable to overcome an improperly adjusted PRV/PRD, a high-rise crew must have a game plan for creating its own standpipe.
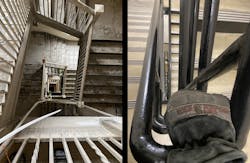
If a gloved hand can fit into the wellhole of the stairwell, a 2½-inch hose can be hoisted or lowered through the wellhole from the floor below the fire floor to the pumping apparatus. One section usually can span about four floors, but any vertical couplings should be supported with webbing or a strap spanner.
If a gloved hand won’t fit into the wellhole or if there is no wellhole, hose can be hoisted outside of the building from the pumping apparatus and into a window that’s near the stairwell from the floor that’s below the fire floor. Obviously, this is less convenient than using a wellhole, but one section still can span about four floors. Again, just as noted above, any vertical couplings should be supported.
If a crew finds that no wellhole is present, that there aren’t any windows near the stairwell and that access won’t allow exterior hoisting of hose, then hose can be laid up the stairs from the pumping apparatus to the fire floor. There are a couple of downsides to this method compared with the aforementioned, which is why it’s third on this list: Each section will span only one or two floors, and even when pushed to the outside of the stair tread, it will clog the stairs.
Regardless of the method that’s used, the hose must be secured near the stairs on the floor that’s below the fire, and the gate valve and pressure gauge should be connected. The pumping apparatus on the ground can charge the hoseline when ordered, and with the gate valve, the engine crew can control its own water and pressure on the floor below.
About the Author

Keith Niemann
Keith Niemann is a 20-plus-year veteran of the fire service with Wichita, KS, Fire Department's training division, assigned to Firehouse 22. As a field training officer, Niemann responds to all fires and major alarms on his shift as well as serves as a lead instructor, teaching hands-on skills to members of all ranks. He also is the president of the FOOLS of OZ, teaching engine company operations throughout the country.
