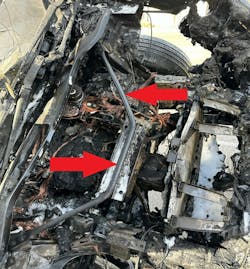
Electric vehicle (EV) design has changed what rescuers encounter compared with automobiles that have internal combustion engines. Gone are the firewalls of the latter. They are replaced with bulkhead walls, which have reinforcement for strength and stability and which aren’t seen commonly on internal combustion engine automobiles. Because of this reinforcement, conventional dash displacement techniques (dash lifts and rolls) might be less effective against modern EV design: The anticipated movement to which rescuers are accustomed when displacing the dash is decreased. Rescuers must be aware of this and recognize the need for alternative dash displacement techniques.
The bulkhead wall design isn’t the only issue that might reduce displacement when using conventional techniques. Increased use of ultra-high-strength steel in EVs, particularly in the passenger compartment, also can lead to a decrease in displacement of the dash when using conventional techniques. Awareness of current design features that are found in modern automobiles allows rescuers to choose the appropriate modern techniques that will be effective in overcoming new vehicle designs.
Bulkhead walls
Bulkhead walls serve two purposes in EVs. The first is for crash protection. These walls are designed to prevent breaching of the passenger compartment from the forward compartment during a vehicle crash. The second purpose is for structural support to the vehicle, particularly during vehicle collisions.
Because EVs lack an internal combustion engine, manufacturers have placed a bracket system forward of the bulkhead wall. This bracket system is designed to add strength and to prevent intrusion into the passenger compartment of the vehicle during frontal-impact collisions. The bracket system typically is made out of ultra-high-strength steel or composite materials and is integrated into the frame of the vehicle. It’s difficult-to-impossible to cut because of its placement in the vehicle. Access to it, particularly in the case of a frontal-impact collision, will be limited. Couple that with its shape and the materials that it’s made of, and attempting to free victims from the vehicle will be difficult and time consuming. It is because of the bracket system that conventional dash displacement techniques won’t achieve the anticipated movement when compared with internal combustion engine vehicles.
Tools in tandem
When an EV is identified during the incident size-up, because of the use of ultra-high-strength steel on such an automobile and, more importantly, the reinforcement of the bulkhead wall, the use of an alternative dash displacement technique should be considered.
Rescuers also must be aware that EVs and hybrid automobiles contain and are powered by lithium-ion batteries. These batteries can sustain mechanical damage because of the energy that’s transferred during a vehicle collision. Once the batteries’ cells are damaged, there is a high probability that the cells will produce heat and, ultimately, fire.
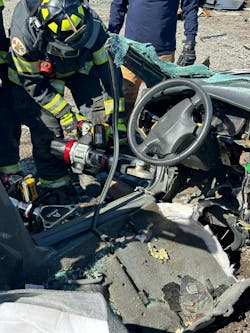
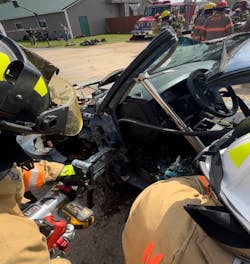
Utilizing the tools in tandem technique ensures that rescuers can overcome the bulkhead wall design of EVs and create space to extricate the victim. The tools in tandem technique combines the movement of the dash lift and dash roll and the strength of two tools that work together to overcome the ultra-high-strength steel and bulkhead wall reinforcement.
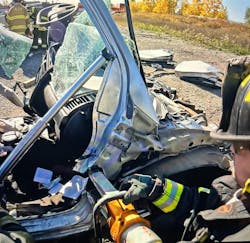
The tools in tandem technique resembles conventional dash lifts and dash rolls when it comes to the relief cuts that are made and tool placement. The same movements are sought, but instead of separate movements, the movements are combined to deliver added strength. As this technique is performed, rescuers will notice that the dash is both rolling and lifting simultaneously as the dash is displaced.
After the incident size-up is complete and the vehicle is immobilized and shut down, take the steps that are listed below to perform the tools in tandem technique.
Step 1
Place cribbing under the A-pillar, to carry the load of the spreader to conduct a dash lift. As is the case with any pushing operation in vehicle extrication, the load force of the spreader(s) must be captured and carried down to the ground. Cribbing that’s positioned under the A-pillar ensures that the rocker channel stays intact and that upward movement of the dash is created.
Step 2
Place relief cuts at the bottom of the A-pillar, at the top of the A-pillar and on the frame rail that’s behind the strut tower.
When placing the relief cuts, it’s important to ensure that the cuts are made all of the way through the material and that those areas are exposed prior to cutting for the peak and peel, so any airbag cylinders that might be located on the A-pillar can be avoided.
When making the relief cut at the bottom of the A-pillar, the first cut should be perpendicular to the A-pillar. This bottom relief cut shouldn’t be made near the rocker channel. Rescuers should leave at least four inches of material under their cut. This helps to decrease the likelihood of the spreader pushing through the rocker channel.
Often, particularly during training, the first cut is placed with the tool positioned in line with the rocker channel. This approach can cause the tool to move into the passenger compartment.
Placing the first cut perpendicular to the A-pillar decreases the movement into the passenger compartment when the second or completing cut is made. It’s important to train this way; building the muscle memory is key, so as to not slow down the extrication process.
One added tip for relief cuts: Making a pie cut on the bottom A-pillar relief cut creates more space than otherwise would be produced, which allows for spreader tips to fit deeper inside. This decreases the likelihood of crushing the bottom A-pillar.
Step 3
After the cribbing is in place under the A-pillar and the relief cuts are made, the tools must be set so that the dash can be displaced.
Place the tips of the spreader in the relief cut at the bottom of the A-pillar. The spreader should be perpendicular to the A-pillar, similar to how a conventional dash lift would be accomplished. Ensure that the spreader tips are as deep as possible. This reduces the likelihood of having to stop the operation to reposition the spreader. A deeper positioning also might decrease the likelihood of compressing the A-pillar downward toward the rocker channel.
After the spreader tips are in place, the ram should be inserted with the nonmoving end to the B-pillar side of the vehicle along the rocker channel and the moving end placed high on the A-pillar. Again, this is similar to the position that’s needed when performing a conventional dash roll.
Step 4
Once the spreader and ram are in position, you’re ready to begin to displace the dash. This is a ram-led displacement. The spreader is in position to follow the movement that’s created by the ram.
As the ram begins to displace the dash, the spreader will begin to open following the roll of the ram and providing the lift.
Once the ram has maxed out, it should be removed, and the spreader can continue to lift, displacing the dash, to create additional space. Removal of the ram at this point also provides access to the patient compartment and the patient without the ram being in the way for extrication.
Using the ram for dash displacement often creates an obstacle for rescuers, by which the patient might need to be removed over that ram. This tools in tandem technique eliminates that obstacle. The spreader, which is out of the extrication pathway, also creates a wedge to hold the progress that’s been made.
Strength leads to space
Utilizing the ram and spreader in tandem creates both a dash lift and a dash roll, to ultimately provide the strength that’s required to overcome the bulkhead wall design of EVs and to allow for effective dash displacement.
This combined movement of the dash also creates more space than typically is produced via conventional dash displacements. Space is created not just at the pillar side of the vehicle but also in the forward area, where feet might be entangled.
The tools in tandem technique also is effective for overcoming dash tie straps, which often create an uneven or angled dash displacement.
PRODUCT SPOTLIGHT
Cutter
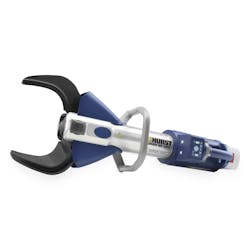
The F7, which is Howell Rescue System’s largest Genesis Rescue Systems extrication cutter, is capable of effortlessly cutting through every material category that’s on the NFPA cut rating table, all while running on a Milwaukee M18 battery platform. The state-of-the-art tool’s power and precision make it an essential asset for rescue operations, so first responders can tackle the most challenging extrications with confidence and efficiency.
Rescue Tools
Cloud-Connected Extrication Tools
Modern Techniques for Modern Vehicle Designs
Vehicle construction changes continually. First responders must be aware of the changes in the design of new vehicles and that conventional extrication techniques might not be effective against today’s automobiles. It’s critically important, particularly when dealing with electric vehicles and hybrid vehicles, that first responders choose extrication techniques that rapidly and effectively provide an extrication pathway to remove victims.
The introduction of lithium-ion batteries in new vehicle technology presents the very real threat of post-collision vehicle fires. When entrapment occurs in these vehicle types, first responders must choose the right techniques to avoid entrapment with vehicle fires. This should start with extrication training. Too often during training we use, older extrication techniques are used with success, because the vehicles that are used in trainings often are older vehicles that lack modern design features. Training modern techniques on older vehicles will help first responders to build the skills to overcome modern vehicle design.
About the Author

Chris Soda
Chris Soda is a 17-year member of the Chicago Fire Department (CFD), where he currently is assigned to Engine Company 96 in the city’s Austin neighborhood. He teaches at Northeastern Illinois Public Safety Training Academy, where he is the program coordinator for the Vehicle & Machinery Operations and Vehicle & Machinery Technician programs. Soda also has been an instructor for the CFD’s Quinn Fire Academy, teaching candidate firefighter’s vehicle extrication. He is the owner of Junk Yard Dog Extrication Training, where he teaches emergency response to electric vehicles.
