In the past, workers and would-be rescuers have become caught and, in some cases, killed needlessly in trenches that have collapsed suddenly, and with little to no warning. It has become commonplace that the public relies a great deal on the local emergency services to handle these incidents. With that in mind, we will look at this type of incident and prepare a safe and efficient response to them.
What is a trench?
A trench can be defined as a temporary excavation in which the length of the floor (bottom) of the trench exceeds the width of the floor, and the depth of the trench is greater than the width of the floor. For ease of nomenclature, many teams identify an excavation as a hole where the floor’s width is much greater than the actual depth of the trench. While there are differences with each, both can be very dangerous situations to deal with.
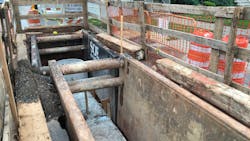
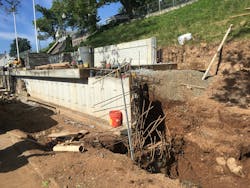
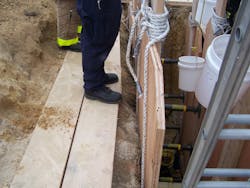
Trenches are made up of five main parts: the lip, or the top two feet of the wall; the belly, or center of the wall; the toe, or bottom two feet of the wall; the wal, which is comprised of the Lip, Belly, and Toe; and the flooor, also known as the base of the trench. It is important to identify the parts of the trench during the incident, as each part’s involvement in the collapse can offer various problems dealing with the stability of the trench (photo 1).
There are many reasons trenches are dug, including storm drains, sanitary lines, utility services and repair, and roadway renovation and repair. While their purposes will vary, there are some safety standards that must be addressed while the trench is open:
- Any excavation or trench greater than five feet in depth must be shored.
- Excavation of a material to a level no greater than two feet below the bottom of the support system will be permitted.
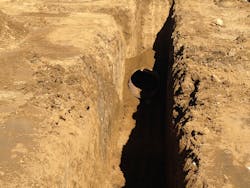
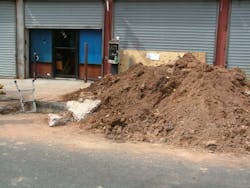
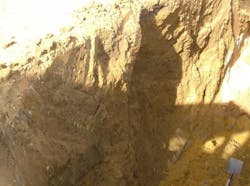
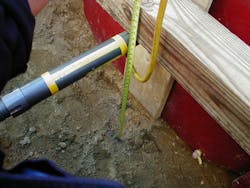
- Excavated material (also known as the spoil pile) shall not be piled any closer than two feet from the lip of the trench (photo 2).
- Personnel shall be protected from the hazards of cave-in while entering, working in, and exiting the trench.
- Personnel are not permitted in shields or trench boxes while they are being installed, removed, or moved vertically.
- In trenches less than five feet, shoring may be required if examination of the hole by a “Competent Person” suggests a potential collapse situation; vibration from road traffic or machinery can cause a cave-in; the trench has been open for an extended period of time (24 hours); or the trench runs parallel within two feet of a roadway or second open trench.
For a complete list of regulations regarding trenches, familiarize yourself with OSHA Regulations regarding trenches, mainly 1926.650; 1926.651; 1926.652; 1926, subpart P, appendices A, B, C, D, and F. Better yet, print out copies of these regulations and carry them on your apparatus; they make great reference materials.
The size-up for the trench collapse should begin during the response to the scene. Familiarization with your jurisdiction should help you identify any target hazards the area may possess, and what resources you will need to abate them. Once on-scene, the primary focus should be to regain some sort of control of the incident; it may be necessary to remove would-be rescuers from a dangerous area PRIOR to your rescue operations. Furthermore, crowd control is essential; it will be necessary to keep onlookers, media personnel, and non-essential personnel away from the hot zone.
Setting up zones
During this time, performing accountability of the staff on-scene prior to the collapse is paramount; after that, it can be determined how many personnel are unaccounted for. These are some reasons why it is important to set up work zones on the scene. The hot zone is the area where the actual trench rescue operations are performed. This area can be up to five times the depth of the trench. Next comes the warm zone, which is the area where the Command Post, Tool Staging, Shoring preparation, and other activities associated with the rescue are taking place. The last area is the cold zone, located around the warm zone, for support operations. This remote area helps to ease load forces on the open trench and is usually at least 20 times the depth of the trench away from the hot zone.
Many rescue teams have found it beneficial to carry a tactical worksheet or site survey sheet for trench rescue. The sheet is like a confined space permit; however, it is geared directly towards the hazards faced in a trench operation. Items such as trench dimensions, number of victims, utility hazards, and atmospheric monitoring results could be documented, along with on-site action checklists that can be detailed specifically to these types of incidents.
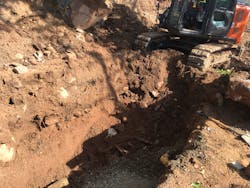
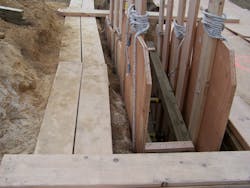
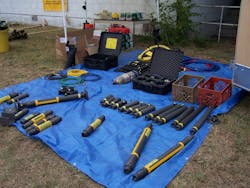
Next, it is vital to determine what is currently going on at the incident. Any hazards that continue to cause danger on scene, such as vibrations, traffic congestion, energized utilities, and secondary collapse issues must be handled (photos 3 & 4).
A Rapid Intervention Crew should be standing by in the event of a secondary collapse that would entrap would-be rescuers. The area of collapse may provide some clues as to the location of the missing worker. Items such as hard hats, tool belts, pipe strings, and grease cans can give the rescuers an area of proximity as to where the victim may be buried. This would provide an area for rescue operations to begin. It is important to consider that although the victim may not be seen, that does not automatically make the incident a body recovery. It may be possible that the victim is positioned in a manner that will protect the chest and allow for expansion from the weight of the collapsed materials. There may also be a situation where debris or equipment may have resulted in a void that allows the victim to breathe for some time while buried.
Determining soil types
When dealing with trenches, it is important to identify the type of soil involved in the incident to assist in determining the equipment needed to safely shore the trench. OSHA has defined four categories for most soils:
- Stable rock is a natural solid material that can be excavated, but it will remain somewhat intact when exposed to the elements. It can sustain vertical walls up to 90 degrees. This type of material usually requires the aid of a blasting agent to assist in digging in these areas.
- The next soil that provides the most stability are referred to as Class A Soils. These have an unconfined compressive strength (load per unit area at which a soil will fail under compression load) of at least 1.5 tons per square foot. Examples of these types would include strong clay that has not been dried out, cemented soils, hardpan soils, and clay loam.
- Class B Soils provide a lower level of stability. These soils have an unconfined compressive strength of .5 to 1.5 tons per square foot. It is not uncommon for water to be seeping from the trench walls in this type of soil. These include weak clay soils, dried out unstable rock, previously disturbed soil and granular cohesive soils.
There are a couple of ways to identify the type of soil you are dealing with at the incident. One way is the use of a pocket pentrometer, a small measuring device that classifies soils in terms of consistency. A small diameter shaft is pushed into the soil and the amount of resistance of the force applied is marked on a scale measured in tons per square foot (TSF). There are also a few manual tests that one can perform to help identify the type of soil in a trench:
- Plasticity Test. Mold a moist or damp sample of soil into a ball and attempt to roll it into threads of soil, approximately the thickness of a pencil. If at least a 2-inch length of soil is attained without breaking, then the soil is considered cohesive.
- Dry Strength Test. If the soil is dry and crumbles on its own or with little pressure, then it can be considered unstable. But if the soil breaks into clumps that are difficult to break, then the soil is considered cohesive.
- Thumb Penetration Test. Take a sample from the top of the spoil pile, which would represent the bottom of the trench, and take a second sample from the bottom of the spoil pile, which would represent the top level of the trench. Take both samples and roll them into a ball. Try to impress your thumb into each ball to see how difficult it is to break the sample apart. If the thumb easily penetrates, then the soil is considered unstable; but if it takes great effort to penetrate the soil with your thumb, then the soil is considered cohesive.
It should be noted, however, that no matter the soil identified that the emergency services find upon arrival to the collapse, keep in mind that THE SOIL DID INDEED COLLAPSE. Therefore, it is wise to classify ANY collapse soil as Class C Soil.
Personnel and Equipment
An operational guideline should be in place, so that the response to a trench collapse includes the right equipment and personnel to operate on-scene. With many departments operating with a minimal manpower pool, it is imperative that the guideline includes automatic aid departments that are proficient in this area; as I have said before, manpower is the most precious resource departments bring to any emergency scene. Along with adequate manpower, there should be considerations for the following equipment as well:
Shoring Materials. These include the materials that will be put in place to make the trench safe. The sheeting materials can consist of SHORFORM, FINFORM, or EUROFORM wooden panels. These panels are a minimum of 1” high-grade plywood coated with a phenolic resin that seals and strengthens the sheets to take the abuse of trench work without failing and cracking. These panels are fitted with UPRIGHTS, which are 2x12 wood planks that provide considerable strength to sheeting and serve as an area for cross-bracing to be attached. Many times, cross-bracing can include cut dimensional timbers, which will vary in size and diameter, depending on the size and soil type of the trench. These timbers are usually made from Douglas Fir or Southern Pine, as both will provide ample warning (cracking) prior to failure. Wood shoring materials should be inspected for physical damage from flexing during operations, rot and decay, warping or any other defects that might cause the material to fail under pressure (photo 6).
Other forms of cross-bracing include Hydraulic Struts and Pneumatic Struts. Aluminum Hydraulic Struts are pre-engineered shoring systems that combine cylinders and either horizontal or vertical rails to support the sidewalls of a trench. Aluminum Pneumatic Struts are pre-engineered shoring struts made of aluminum cylinders that are charged with air to extend against the trench walls, set at a specific air pressure to meet the requirements of the soil type. These struts are then manually locked into place for maximum compressive strength (photo 7).
The total force on the strut can vary based upon the depth of the trench and the compressive force of the soil and additional loads around the lip of the trench. No matter the type of equipment, it is vital that all personnel are well-versed on their use and operation.
Tools and Appliances. There are other support tools and equipment that should be readily accessible at the scene, including:
- Pneumatic framing nailers and associated equipment.
- Chop saws, circular saws, and chain saws.
- Tape measures, pencils, chalk lines, speed squares, and claw hammers.
- Pinch bars, sledgehammers, vent fans, and atmospheric monitors.
- Camp shovels, 5-gallon pails, utility rope, and patient packaging equipment.
Rescuers can begin to make the trench area safe; approaching the trench end, crews start to drop Ground Pads, which are used to help distribute the weight of personnel and equipment around the lip of the trench. These pads are 4 foot by 8-foot sheets of ¾” plywood; the spoil pile side will require 2 by 12 planks between the trench lip and the spoil pile (photo 8). These ground pads are used to surround the trench area at least equal to the depth of the trench and should overlap one another to assure there are no open areas of soil. As crew members move the spoil pile further away from the lip, it may be possible to lay additional ground pads on that side of the trench.
While the ground pads are being placed, atmospheric monitoring and supplemental ventilation should be underway. It may be possible to collect methane inside the trench, which needs to be removed. Methane is a common gas found in the soil and has a flammable range of 5.3% to 19.3%, and it needs to be removed before a flash fire can occur and injure the victim and rescuers. Fans that are used for ventilation should be intrinsically safe and be capable of moving a minimum of 1,000 cubic feet of air per minute.
Identifying the type of collapse
Rescuers must identify the type of collapse that has occurred. Some common types of collapses include:
- Spoil Pile Slide. This collapse occurs when the spoil pile slides back into the trench. Sometimes machine operators can mistakenly knock part of the spoil pile back into the trench, or the spoil pile may be placed too close to the lip, causing a surcharge load on the edge.
- Side Wall Shear. This collapse occurs when a portion of the wall breaks off and falls into the trench. Signs of impending wall failure include fissure cracks along the edge of the trench and are more common in trenches that are open for long periods of time.
- Slough-in. When there is poor water drainage in the trench soil, the belly of the trench wall falls inward, and creates a dangerous overhang under the ground pads. This is a tough trench to shore, as the voids created by the collapse need to be addressed.
- Lip-in. There are times when the weight of the spoil pile too close to the lip, or heavy machinery operating in the close vicinity of the trench can cause the lip to fail, taking everything on the lip (equipment, personnel, etc.) with it into the trench.
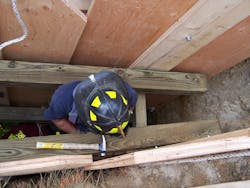
Once the collapse pattern is identified, crews can begin to shore up the walls of the trench. A means of egress, such as a ladder or stairway, must be located no further than 25 feet of lateral distance for rescuers; this is best served as keeping the “2 ways out” rule in mind. Place at least two ladders for egress in the trench, one at each end. Sheeting panel assemblies are then laid into place, facing opposite of each other. Once in place, rescuers measure between the panels to install adequate cross-bracing. Cross-bracing will vary, with soil type, trench dimension, and type of bracing that will be employed. The bracing is then cleated and secured into place, and the process is repeated until there is a safe area to operate in to remove the victims.
The next step after the cross-bracing will include Walers, which are large diameter wood dimensional timbers (6”x 6” minimum) that will serve to support the initial panels and allow the installation of supplemental shoring timbers. The sheer size and weight of the Waler will require a lot of manpower to install in a limited amount of room at the floor of the trench. Once the Waler system is installed, and supplemental shoring is in place, rescuers may remove the center cross-bracing, should there be a need for more room to allow for victim removal (photo 9).
Along with shoring the trench, there are a lot of other things going on inside the trench. Patient care will be an ongoing operation, in order to stabilize the victim while the soil is removed around them. With the potential for Compression Syndrome, it is vital that advanced life support (ALS) is on-scene and providing necessary treatment. However, personnel inside the trench are limited to only one rescuer per shored sets of panels. For example, if there are only two sets of panels shored and in place, that will allow only one ALS provider and one rescue tech inside the trench for removal. Crews that are operating outside the trench can begin to prepare immobilization and removal equipment, so the victim can be packaged and removed as quickly and efficiently as possible (photo 10).
Even though the victim has been removed and is receiving definitive medical attention, the scene is far from stabilized. Shoring equipment and tools that were used to make the trench safe will have to be removed. The process is reversed for removal, but the scene becomes more hazardous, as the trench has been open to the elements for a longer period, which may have allowed for the soil to become drier and more likely to collapse. Great care must be taken during demobilization so that all rescuers remain safe during the termination of the incident.
Conclusion
The scene of a trench collapse is a dynamic, high-risk environment that can result in injury and death to workers and rescuers alike. A trench can collapse at any time without any audible or visible warning, especially when there are no protective systems put in place inside the trench. Some victims are would-be rescuers who were unaware of the hazards associated with these incidents; therefore, it is imperative that rescue from these situations should only be attempted by emergency personnel trained in trench rescue. It is imperative that responders who bear this responsibility in their jurisdictions be adequately prepared for these operations.
Until next time, stay focused and stay safe.
About the Author

Michael Daley
MICHAEL DALEY, who is a Firehouse contributing editor, recently retired as a 37-year veteran who served as a captain and department training officer in Monroe Township, NJ. He is a staff instructor at multiple New Jersey fire academies and is an adjunct professor in the Fire Science Program at Middlesex County College. Daley is a nationally known instructor who has presented at multiple conferences, including Firehouse Expo and Firehouse World. His education includes accreditations as a Chief Training Officer and a Fire Investigator, and he completed the Craftsman Level of education with Project Kill the Flashover. Daley is a member of the Institution of Fire Engineers and a FEMA Instructor and Rescue Officer with NJ Urban Search and Rescue Task Force 1. He operates Fire Service Performance Concepts, which is a training and research firm that delivers and develops training courses in many fire service competencies.
