University of Extrication: Anti-Ejection Roof Airbag Systems
Beginning with 2014 model year vehicles, the National Highway Traffic Safety Administration (NHTSA) requires new passenger vehicles sold in the U.S. to comply with Federal Motor Vehicle Safety Standard (FMVSS) 226. This document specifies that in a rollover crash situation, for example, occupants inside the vehicle are not to be ejected—a concept called ejection mitigation. Although FMVSS 226 does not specifically state how auto manufacturers are to comply with this specification, laminated door window glass has been introduced as one potential solution to this requirement. In addition, and of importance for rescuers to be aware of, many manufacturers have chosen to change their existing roof airbag system to a new style of roof airbag system—something we’ll call the anti-ejection roof airbag.
Older model roof airbags
For 1998 to 2013 model year vehicles that have roof airbags and are involved in a side collision or a rollover crash scenario, responders have become accustomed to encountering deployed roof airbags on one side or possibly both sides. These deployed roof airbags are generally found dangling along the side roof rail area. By the time we make patient contact, the gas inside the nylon material of the roof bag has dissipated and the roof bag is deflated (feeling flat and looking thin in appearance).
Because the deployed bag obstructs access to our patients and the interior on that side of the vehicle, we typically use scissors or a serrated knife to cut away portions of the nylon bag material as we clear a path to our patient and improve our interior access.
There is no issue to cutting away these first-generation deployed roof airbags. If the nylon of the deployed bag is held tight in one hand, with the other hand we can easily use our cutting tool to cut away the obstructing portions of the bag itself. We either remove a section entirely or cut it and flip it up onto the roof to get it out of our way.
Anti-ejection roof airbags
Since the new FMVSS 226 ejection mitigation standard is now in effect, the automaker might incorporate the new anti-ejection design for their roof airbags. It is important that responders realize that there will be differences in appearance and physical condition as we encounter these new roof bags when compared to what we are used to with the original design of roof airbags.
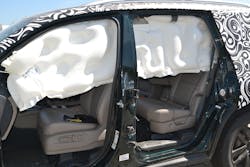
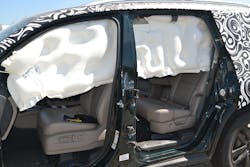
When an anti-ejection roof airbag deploys due to a side impact or a rollover incident, one difference that responders will immediately note is that the roof bag will most likely still be “inflated.” One of the design concepts of an inflated roof bag is that it does not immediately deflate, so it can be part of the solution for keeping or restraining occupants inside the crashed or rollover vehicle. In addition, some anti-ejection roof bags have a nylon cord, called a tether, secured to the A-pillar. This tether helps keep the roof bag down in position as it positions itself across the window openings during the incident. Many of these anti-ejection roof airbags will stay inflated for six seconds or more by design. As a rescue instructor in a static research situation with new vehicles, deployed anti-ejection roof bags have remained deployed, inflated and firm for more than 10 minutes.
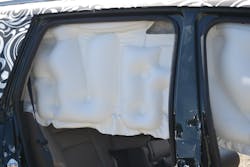
Because the new roof airbags are designed to hold their internal pressure for a longer length of time after deploying, they will be found by rescue and medical personnel on scene to still be down across the window area, inflated and firm. Rescuers will also note that there are thicker, bulging portions of the airbag as well as thin sections along the length of the roof bag.
To better understand this new design, each of the inflated, thicker portions of the roof airbag can be squeezed by hand without any danger or safety concern. The bulging portion, once squeezed, will essentially come back to its inflated condition once the rescuer’s grip is released.
Tactics and techniques
The challenge of having a deployed roof airbag obstruct patient access continues to exist with the anti-ejection bag as well. The big difference is that the new design roof bag is deployed and still inflated. It has not bled down and become just a length of hanging nylon along the side of the vehicle.
To remove a portion of an anti-ejection roof airbag that is in your way involves first bleeding the internal gas pressure out of the bag itself. This can be done efficiently and quickly by simply cutting into or puncturing any “fat” section of the roof bag. Once cut or punctured, the entire roof bag will instantly deflate with a slight hissing sound.
With any bulging section cut and the deployment gas inside the bag escaping, responders can resort back to the familiar “cut it away” procedure we currently use on the original, first-generation style of roof bags. Take your scissors and cut through the layers of the now deflated nylon airbag to remove a section of it or to allow it to be flipped up onto the roof to get it out of the way.
The goal is that rescue and medical personnel become familiar with these anti-ejection roof bag systems and know how to defeat them at a crash scene quickly and efficiently.
Cutting Anti-Ejection Roof Airbags
- Access the deployed roof airbag
- Use scissors to cut or puncture any of the “fat” portions of the airbag
- Upon deflation of the roof bag, cut away portions obstructing access
About the Author
Ron Moore
RON MOORE, who is a Firehouse contributing editor, recently retired as a division chief with the McKinney, TX, Fire Department and now serves with Prosper, TX, Fire Rescue. He self-published the Vehicle Rescue 1-2-3 training manual and serves as the forum moderator for the extrication section of Firehouse.com . Moore can be contacted directly at [email protected].


