Crashed Passenger Vehicle Stabilization Techniques
Vehicle stabilization seems to be an afterthought during vehicle extrication. Some suggest that a vehicle doesn’t need stabilization unless the vehicle is unbalanced. Only then will the cribbing and struts come out of the rescue truck. Unfortunately, there is a history of unstabilized vehicles rolling forward or backward, tipping over and sliding out of position after the initial scene size-up. These movements of the crashed vehicle can and have led to victims and rescuers being pinned or crushed in the process.
Employing stabilization skills should be second nature to members of the rescue company. Good, proactive practices lead to consistent successful rescues and increasing familiarity with the tools of the trade.
Cribbing
The most common passenger vehicle stabilization scenarios that are encountered by rescue personnel involve a vehicle that’s on all four wheels and a vehicle that’s on its side with the door and wheel in contact with the ground or the door window and roof drip edge contacting the ground. Each of these rescue scenarios involves best practices to stabilize the vehicle utilizing available resources at your department.
Your first goal should be to stop large movements, such as a vehicle rolling away. The next goal should be to stop smaller movements, such as taking the bounce out of the automobile’s suspension system.
Because it’s impossible to get into the specifics of every type of rescue strut or one-off tool that can be employed by a rescue company to carry out vehicle stabilization, the focus in this article is on the general application of struts and cribbing.
Cribbing is an underutilized and, often, understocked tool in departments’ rescue inventory. The shapes, sizes, composition, and transport of cribbing between the rescue truck and the scene take many forms and merit their own article to discuss the nuances of the subject matter properly.
Rescuers should follow a best practice when they build cribbing stacks. Cribbing stacks always should start with a solid foundation. Suppose the soil or surface that’s encountered is uneven, slippery or capable of sinking. In such a case, the rescuer must take steps to remedy the issue.
Fixing uneven, slippery or soft surfaces might require using: a different location upon which to build the cribbing stack; a solid base that’s made of cribbing as the first layer of cribbing (see below); or a ladder truck’s outrigger plate to disperse the downward pressure of the vehicle.
Carefully build crib stacks with two-by-two alternating layers of cribbing for passenger-vehicle-size loads. You should maintain a minimum 4-inch overhang on each side of the layers. This overhang prevents creep and collapse of the cribbing stack if the vehicle were to shift.
If the ground where a cribbing stack is to be built is soft or muddy, it’s advisable to lay down a solid layer of cribbing before starting to build the stack, so the initial layer of cribbing won’t sink unevenly into the soil.
Wedges that are used on top of stacks and in line with the top pieces of cribbing should fill voids that are between the top of the stack and the underside of the load. Rescuers must tap wedges into position with a striking tool, so the wedges are secure.
Overdriving the wedges into position not only can begin to mechanically lift the vehicle, which isn’t the objective in this case, but can cause unnecessary movement of the load and possible injury to patients.
Suppose the top layer of cribbing doesn’t run perpendicular to the face of the load: The rescuer might need to rebuild the crib stack or build a solid top layer, so the wedges receive support along their length with a piece of cribbing below.
The most common cribbing dimension is 4 x 4 x 24-inch long. Another cribbing dimension to consider is the 6 x 6 x 24-inch. I am a proponent of the larger size in conjunction with 6 x 6-inch wedges that are cut diagonally from an 18-inch-long piece of cribbing. This design fits as a stacked, two-piece system that’s placed perpendicular to the load and below vehicle pillars, to quickly fill the void under most passenger vehicles that are on all four wheels.
Step chocks also are effective for cribbing under loads of varying height. That said, rescuers should avoid overreliance on step chocks, to reduce cribbing that’s available on a rescue truck.
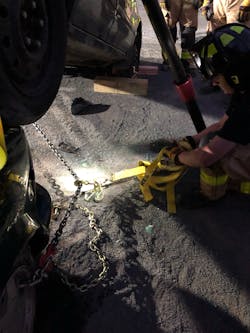
There are a few basics when it comes to effective rescue strut placement for stabilizing a passenger vehicle. Always place the strut head, or leading tip, against a substantial part of the vehicle, such as heavy steel, and an area where the strut is unlikely to slide out of position, such as a corner. Remember to follow your guidelines regarding the acceptable operating angles of your struts. (Some struts have an effective angle range of 45–75 degrees to the ground.) Placing struts outside of those operating angles decreases their stability.
One of the most challenging tasks of correctly placing a rescue strut is where the ratchet strap is connected to keep the base of the strut from kicking out under load. Ideally, the ratchet strap is perfectly in line with the strut, which, ideally, is perpendicular to the load. Ratchet strap attachment to the load should be within approximately 10 degrees from the midline of the rescue strut. When rescuers begin to exceed that, the base plate at the bottom of the rescue strut chatters slowly across the ground when tightening the ratchet bail.
During this process, the base plate moves to face the connection point of the ratchet. Some refer to this movement as the base plate finding its “happy place.”
In the case of the strut base plate moving beyond the 10-degree angle, the movement could be extreme enough that it would cause the head of the rescue strut to dislodge itself from its secure position.
Often, circumstances dictate that there must be a balance between the location of the rescue strut head and a corresponding location for the ratchet strap connection. Great strut head placement is useless if there isn’t a good attachment point for the strap.
A rescue-grade chain is a worthy addition to any rescue truck’s cache of equipment. The chain can be attached between the front and rear to provide nearly limitless attachment points for the ratchet strap.
Two wraps around the bail are required to maintain a proper grip when starting to ratchet, and tightening the strap should stop once the base plate of the rescue strut starts to creep in.
If the proper angles of the strut are maintained during the process, then very little weight is applied to the ratchet strap.
On four wheels
The most basic stabilization task is the passenger vehicle that’s on all four wheels. Although these types of crashes might pose significant challenges to the rescuer in the context of extrication, the stabilization portion of the rescue scene might be less arduous. These vehicles need immediate chocking of their wheels in front and behind. Chocking wheels might seem evident to many, but it’s imperative to chock the wheels perpendicular to their travel with 4 x 4-inch pieces of cribbing. Unfortunately, I increasingly see firefighters place wedges in line with the wheel’s travel, which serves as a ramp, which allows a vehicle to roll forward. Without doubt, this practice must be corrected.
Many suggest letting out the air out of tires by pulling the valve stems or by puncturing the tires’ sidewall to increase rolling resistance and to allow a vehicle to settle down onto cribbing stacks. I’m not a proponent of this practice for numerous reasons. The proper placement of wedges on top of crib stacks will address the need to fill any remaining voids between the cribbing stack and the crashed vehicle’s underside.
There’s a safety concern: An unsuspecting member of the rescue company might pull the stem or puncture a high-pressure tire on a larger pickup; the rapidly deflating tire could injure the rescuer severely.
Stabilizing a passenger vehicle that’s on all four wheels includes cribbing below the A-, B- and C-pillar and using wedges to fill any void spaces. Rescuers must consider the need to open the door to remove a patient. A crib stack and wedges could impede door swings. Impedance of door swing typically occurs in the area of the B-pillar. Rescuers might have to forego the crib stack under that pillar. If the vehicle requires cribbing at that point because of crash damage and sagging, the rescuer might need to remove the door to negate the conflict with the crib stack.
Side-resting automobiles
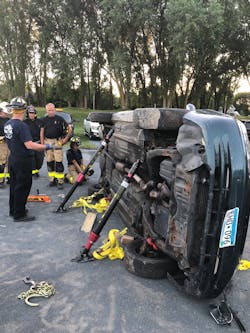
Crashed vehicles that are located on their side at incident scenes typically present themselves in one of two ways. The first and more common presentation is the vehicle with its door and wheels in contact with the ground. This presentation is a more stable scenario. It usually allows stabilization on both sides of the vehicle via many attachment points.
The initial actions to stabilize a vehicle that’s in this position would be to apply wedges between the roofline and undercarriage and the ground in line with the roof pillars to resist the vehicle from rolling over. However, the rescue company should ready its rescue struts on both sides of the vehicle in an “A-frame” deployment. If there’s a greater risk of the crashed vehicle rolling toward one side, two struts can be applied to that side to resist the movement.
On the underside of the vehicle, placement of longer struts just below the edge of the outside rail of the undercarriage is a stable and robust location for strut heads. On the roof side of the vehicle, the upper corners of the front or rear windshield are good locations for the placement of strut heads. Rescuers want to avoid placing the strut heads against items that consist of soft metal, such as exhaust systems or drive trains on the vehicle’s underside or in the speaker deck on the roof side of the vehicle, which can fail to hold up the load.
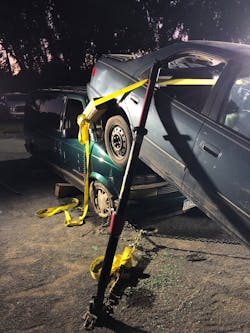
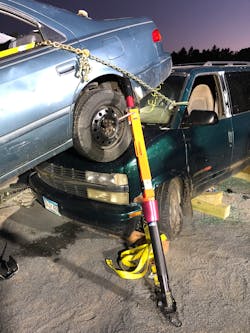
The second vehicle-on-its-side presentation occurs when the vehicle rests on its door and the drip edge at the top of the door windows. This presentation is a precarious situation. It presents the rescuer with fewer options for securing the vehicle, because the smooth surfaces of the roof, front hood and trunk deck tilt toward the ground.
Initially, rescuers should apply cribbing and wedges to the voids that are under the roof edge then apply rescue struts to the roof side of the vehicle in the upper corners of the front and rear windshield. Another option is to secure one or more pillars with a chain, cable come-along, winch or tow cable or with rescue chain that’s run from the opposite side of the vehicle and tied back to an anchor, such as a rescue attachment on an emergency vehicle or other appropriate bombproof-type anchor.
About the Author

Joseph Blank
Joseph Blank is a captain with the St. Paul, MN, Fire Department. He has been in the fire service since 1987, including a five-year appointment to the Rescue Squad. Blank is co-owner of Make the Move Training LLC as well as a fire training manager at Northwoods Technical College in Wisconsin.