Vehicle Extrication Efficiency for Firefighters With Limited Working Space
Key Takeaways
- Because many electric vehicles have charging posts and high-voltage wiring that’s located in the A-post on the driver’s side, placing a relief cut in the A-post to displace the dashboard isn’t an option. Instead, firefighters who must remove a victim should use the no-relief-cut dashboard displacement maneuver.
- Roof removal and displacement of a crashed vehicle by responding firefighters can be problematic when the space in which they operate is limited. In such an instance, a bulkhead roof cut might be in order.
- Removal of victims from the third-row of an SUV or minivan when access isn’t available from the second row can be accomplished by performing a third-row rescue cut. Two vertical cuts are made down the side of the vehicle and two horizontal cuts are made across the entire roof assembly.
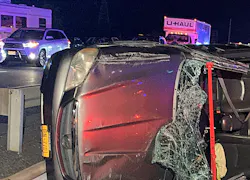
Emergency responders who provide vehicle rescue operate in a highly hazardous arena, trying to safely disentangle vehicle occupants from their entrapment while traffic moves past the emergency scene. Of course, many safety practices are put into place on arrival at the extrication scene even before the rescue tools are deployed. These include early warning devices, spotter vehicles, apparatus positioning practices, and reflective clothing that’s worn by roadway workers and emergency responders. However, the footprint of the operating area can be limited at times based on the location of the accident. There is a delicate balance between performing disentanglement skills on the roadway and allowing traffic to continue past the scene.
Best practices suggest that efforts to limit the footprint of the operating area help to keep responders safer, but it doesn’t provide for extra room to remove displaced materials from the involved vehicles. Taking that into consideration, after stabilization of the vehicle has been deployed, a few common displacement skills can be modified to tighten up the operating area to improve safety and efficiency.
No-relief-cut dash displacement
Displacing a dashboard from a victim is common in head-on accidents and when a vehicle strikes an immovable object. Placing a relief cut in the A-post allows for additional displacement of the dashboard and the post from the victim. That said, many electric vehicles (EVs) have charging posts and high-voltage wiring that’s located directly in the A-post on the driver’s side. When faced with this issue, displacing or placing a relief cut in the A-post isn’t an option. In this case, displacement of the dashboard can be completed by first locating the connection point where the dashboard/bulkhead bar meets the A-post. Many times, this area is near the top of the A-post on the inside of the hinge side of the front door. Place the upper spreader arm in a position where it can make contact under the dashboard/bulkhead bar.
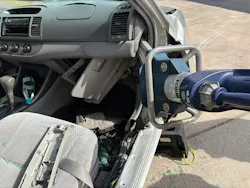
Next, place the tip of the lower spreader arm on top of the rocker panel as close to the A-post as possible. The spreader should be placed at a slight offset of parallel to the vehicle. This allows the body of the spreader to be on the outside of the passenger compartment and the spreader tips to be on the inside the compartment.
To add additional support and to direct the force to the ground, cribbing or a step chock can be placed under the rocker panel directly in the vicinity of the tip of the lower spreader arm.
Once the tool is in place and stabilization needs are secured, the spreader can be opened to increase the space between the dashboard and the victim area.
As an alternative, this technique can be applied at the center of the dashboard and on top of the center console area, and the spreaders can be opened to gain space between the dashboard and the victim. That said, this technique can’t be utilized on an EV or hybrid vehicle that has the battery compartment underneath the vehicle. This can damage the battery and cause failure or thermal runaway.
Bulkhead roof cut
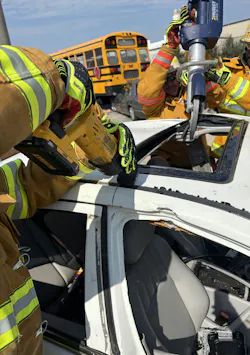
Roof removal and displacement are completed when access to multiple victims and rapid removal of severely injured occupants is warranted. However, removing a large component of the roof assembly of a vehicle requires additional personnel on scene, a space to place a large vehicle component out of the area, and securing the component back onto the vehicle when the vehicle is being removed from the scene. An alternative is performing a modification to removal of the roof that’s called a bulkhead roof cut. This procedure involves opening the roof from the center/middle of the vehicle, similar to opening a set of bulkhead doors.
Locate an area on the roof assembly near the midpoint of the roof assembly. This would be directly in front of or behind the B-post on both sides of the vehicle. Peel and peek around the area on top of the B-post by removing the trim, including over the front door and the rear door, to confirm a clear area where the roof cuts will be made.
Cut the roof on each side near the top of the B-post or cut the B-post above the seat belt attachment to separate the roof assembly from the B-post.
Make a cut completely across the roof in the vicinity of the B-post where it can be made safely and efficiently. In the presence of a sunroof or some other type of glass assembly in the roof, retracting the glass into the roof assembly can aid in making a more rapid cut across the roof. This requires a more robust cutting tool to defeat not only the roof assembly but also the tracks and mechanical devices that operate a sunroof.
Cut both A-posts as low to the dashboard as allowable. Use a striking tool to break the windshield, but don’t remove the windshield, because it can be utilized as a “hinge” for the front roof assembly to pivot on.
Remove the rear glass in the C-post assembly and peel/peek behind the trim by both C-posts to confirm that there aren’t any supplemental restraining devices or controls in the posts. Place relief cuts in both C-posts approximately one-third of the way up from the trunk area. Don’t cut through the entire C-post; this will serve as a “hinge” area for the rear roof assembly to pivot on.
Lift both roof sections from the center outward to expose the passenger area of the vehicle. The roof can be opened further with a series of relief cuts by each additional post on the vehicle.
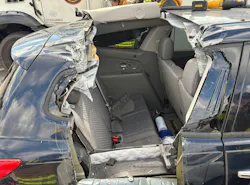
Third-row rescue access
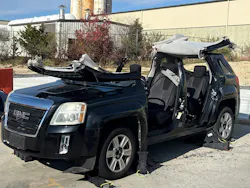
Many SUVs and minivans have third-row seating. Many accidents result in limited access to occupants who are seated in this area, because of seats and vehicle components that surround the third row, trapped victims in the first two rows, or damage and component displacement during impact. Accessing third-row victims can be achieved by performing a third-row rescue cut. This maneuver usually can be performed on either side of the vehicle, but it’s preferable to access the victim from the side opposite the fuel fill/door area.
Determine which side of the vehicle provides the safest and most efficient access and removal of the victim. Remove the glass from that side of the vehicle in the area where victim access will take place.
Utilizing a suitable cutting tool, make two vertical cuts in the rear panel of the vehicle as close in proximity to the wheel area as possible.
Utilizing spreaders, open the spreader arms and clamp the spreaders onto the panel area between both vertical cuts. Pull the spreaders outward and downward, to open up the side panel of the vehicle for lower area access.
Utilizing a suitable cutting tool, place two horizonal cuts as wide as possible across the entire width of the roof assembly, to open up the roof area over the victim to allow vertical access to the victim. It might be necessary to remove the luggage rack/rails from the roof to gain access to the roof area to be cut.

Once the roof and side panel cuts are made and the roof and side panel areas are displaced, the victim can be removed from the top or side of the vehicle.
Flexibility of approach
Successful extrications involve efficient techniques, alternative accessibility as well as flexibility that’s based on vehicle type, hazards that are present and resources that are available. Focusing efforts on limiting the footprint of the hot zone keeps responders safe, and increasing the access to the victim within the hot zone provides the best chances for survivability and success. Rescuer efficiency and proficiency in application of core skills and abilities pay dividends on the emergency scene.

About the Author
Michael Daley
MICHAEL DALEY, who is a Firehouse contributing editor, recently retired as a 37-year veteran who served as a captain and department training officer in Monroe Township, NJ. He is a staff instructor at multiple New Jersey fire academies and is an adjunct professor in the Fire Science Program at Middlesex County College. Daley is a nationally known instructor who has presented at multiple conferences, including Firehouse Expo and Firehouse World. His education includes accreditations as a Chief Training Officer and a Fire Investigator, and he completed the Craftsman Level of education with Project Kill the Flashover. Daley is a member of the Institution of Fire Engineers and a FEMA Instructor and Rescue Officer with NJ Urban Search and Rescue Task Force 1. He operates Fire Service Performance Concepts, which is a training and research firm that delivers and develops training courses in many fire service competencies.