Nighttime Photography
In the United States, the most likely time for a fire to happen is between the hours of three in the afternoon and midnight. In many urban areas, serious fires tend to occur between one and four in the morning. This means that it will be dark outside for many of the fires that we photograph. It also means that unless you have the steady hands of a surgeon and the ability to hold a camera motionless for up to one second or more, you will need to use a flash. As discussed previously, it is the opinion of this author that built in camera flashes are not strong enough for nighttime fireground photography and the use of a powerful accessory flash is recommended.
Before a flash can be used on a camera, the photographer must be familiar with the flash-sync speed of the camera. On manual cameras, it is usually marked with a small "x" on the shutter speed dial. Owners of newer cameras will need to read the camera's manual to find the sync-speed. The sync-speed is the fastest speed the shutter can open in conjunction with the flash and is typically 1/60th or 1/125th of a second.
If a photo is taken with a faster shutter speed than the camera is synced for, a portion of that photo will remain black because the shutter does not remain open long enough for the film to be properly exposed. The shutter speed can be set for the sync speed and slower but nothing faster.
Flash units have several different settings. There are power settings that range from full power to 1/128 power; there are also head settings and on some flashes there are angle adjustment settings. Flash heads may have three settings: wide, normal and zoom and these settings adjust the distance the flash is thrown. Wide is used for wide-angle shots, normal is used for mid-range shots and zoom is used for telephoto shots. On manual flash units, pushing or pulling the flash head in or out will adjust these settings. Camera companies are now selling flash units with automatic head adjustments.
On some cameras, the angle of the flash head can be adjusted from a 90-degree angle to a 180-degree angle. Most, if not all fires, will be shot with the head at a 90-degree angle. A flash that is positioned at a 180-degree angle is usually being used for "fill-flash" and the burst of light is being "bounced".
Another important thing to remember about your flash is its rating. This guide number correlates to the speed of the film being used and the greatest distance the flash will illuminate.
A few things to keep in mind when using a flash:
Always use fresh batteries and keep a spare set handy. This maintains the power of the flash and also the recycle time between shots.
Recycle time is the time that it takes for the flash unit to get itself charged for the next shot. You will be able to hear the flash winding up. Most flash units will have a "ready" light to indicate when the flash is ready for the next shot.
Try to get as close as possible. Zoom lenses will bring the action close to you, but depending on your flash, you may not be close enough to illuminate what is in your viewfinder.
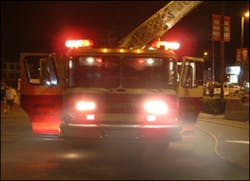
Nighttime photography also provides an opportunity for eerie photos called existing or natural light photos. These shots are taken without the use of a flash and just the visible light is used. Heavy fire conditions or the warning lights on a piece of apparatus can provide enough light for these types of shots.
When taking photos at night, I usually set the shutter speed for 1/60th of a second with an F-stop of 2.8, 4.0 or 5.6 and always have 400 speed film loaded in the camera. I also set the flash for full power, unless I am standing right on top of the subject that I am shooting, and then I will set the flash on automatic and it determines the power of flash for me. These settings work for me. Very few of the departments in my area flood the scene with lights, so I rely heavily on the use of a flash.
There is a technique in photography called bracketing. Bracketing is taking one or two more shots in addition to the one thought to be correct. This can be done by changing either the F-stop or shutter speed. In other words, take a shot with the settings you believe to be correct, say 1/60 and F/4. You leave the shutter speed at 1/60 and take a shot at F/2.8 and then one at F/5.6. Check the results when the film is developed and decide which one looks the best. Try those settings at the next few fires and see if you get the same results. Good luck!
Related:
