The Heavy Hook-Up: The Two-Minute Drill
When it comes to fighting fires in rural settings, water supply is a huge issue. Next to staffing, water is your most valuable asset. The engine company’s primary role in the rural water supply chain is at the plug or drafting at your dumpsite.
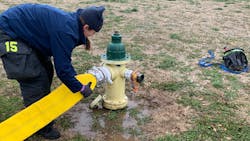
When tapping a plug, we generally perform a heavy hook-up. This refers to making a connection on more than one discharge on the hydrant. Doing this allows you to get as much water as possible, taking advantage of all of the water that’s available.
Know the system
Knowing your water system—the age of the system, the size of the mains, the available pressures, hydrant barrel size, the connection quantities and their sizes—is the ultimate deciding factor on the available water. Get out and flow your hydrants. Get with your water department, fire marshals and codes department. These are the ways to truly know the capabilities of the systems in your first-due area.
Another item to consider is evaluation of your piece of equipment: pumping capabilities, age of the equipment, plumbing, intake manifolds and discharges.
Heavy hook-up steps
A heavy hook-up is used when operating at the fill site for tanker shuttle procedures, when pumping to the attack engine over a long distance or when acting as the attack engine at a fire that requires a high fire flow. This allows you to supply a large volume (more than 500 gpm) of water to the fire scene. Making the connection using the extra outlet at the hydrant can give you added gallons per minute in the range of 32–200 gpm. The process for making the heavy hook-up starts with positioning the rig properly. Remember, you aren’t “parking” the engine; rather, you’re positioning it to get the best bang for your buck upon making the connection(s). You should have the “Swiss Army knife” approach to your equipment: With proper positioning comes the capability to send and receive water from all sides. Having appliances and filler hoses on multiple sides of the rig makes this possible.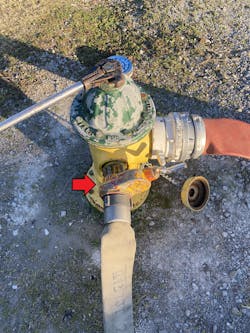
Having all of your equipment marked and stored in a manner to which easy deployment can be done is paramount. Whether you use a hydrant bag or some sort of hydrant package that’s pre-set up on your supply line or you pull straight from the driver’s compartment, taking all of the equipment that’s needed with you the first time will save you several steps. Minimum equipment for this skill is a hydrant wrench, a gate valve, a double female, a steamer connection and the lines that you will connect. Lines should be set up to give you access to all of the couplings without the need to drag the lines back. Donut rolls are perfect for this.
Connections should be made at the pump panel first—both lines if at all possible. This allows you to send the water immediately after making the connection at the hydrant. Remember to flush the hydrant (approximately 5–10 seconds can suffice). This clears any trash or debris that might be trapped in the barrel and keeps the system from malfunctioning.
Next, remove all of the caps to which you will connect and then add your adapters and appliances. The gate valve goes on whichever side outlet where you will make the connection. The valve should be shut. Adding this appliance to your system allows you to get a second line coming off of the hydrant without ever shutting down the hydrant. Next, either a steamer connection is placed on the front of the hydrant or you go straight to the opposite side of the hydrant and make the first hook-up.
Send the water
After the initial line is connected, you can charge the hydrant. Water is sent to the pump but doesn’t enter the pump until you open the intake valve.
Open the valve slowly. You want no more than a 30 psi increase into your system. Now, you can begin to refill your tank if you initially sent water to the attack engine. You then can connect your second line to the hydrant and send water and never have to shut down the hydrant until the operation is complete.
If you have the ability and the time, you can perform the same steps on the opposite side of the hydrant from the beginning, to give you three lines coming off of the hydrant and into your supply engine.
This skill should be practiced all over your district and until the entire crew is proficient. I have seen crews practice the skill so much that they have members who complete connection of both lines (all appliances and adapters), top off their booster tank and send water to the area of need in less than two minutes.
The heavy hook-up is an option that can be used in rural and urban settings. This will give you the most bang for your buck when it comes to water. Remember to always flow your hydrant before making a connection and to tap as many outlets as you can to rob the water from the system. The only limitations to this skill are your water system, your apparatus set-up and your imagination.
Drill every shift. Spot your plugs on medic runs, flow the hydrants after you clear the call, and do it again on the next call. Water always wins. Send as much as you can when you can.
About the Author
Daniel Nelms
Daniel “Chunk” Nelms is a career firefighter for the Nashville, TN, Fire Department, where he has served for 10 years. He currently is assigned to Engine 6 on the south side of the city as a pipeman. Nelms also is a lieutenant/director of training for the Almaville Fire Rescue Department in Rutherford County, TN, where he has volunteered for eight years. He is a senior instructor/co-owner of Nelms Fire Company training company. Nelms is a state of Tennessee Journeyman Firefighter, a certified Fire Instructor and Fire Officer as well as a nationally certified AEMT. He has presented both lecture and HOT classes at Firehouse Expo as well as at numerous other events.