Design Considerations for Aerial Ladder Body Compartments
When preparing a specification for the purchase of an aerial ladder (platform or straight-stick), numerous matters that are related to the apparatus body must be considered. All manufacturers have standard aerial body designs that allow for modifications.
However, there are more restrictions than there are with pumper body designs because of the aerial chassis requirements.
Equipment weight
When considering the purchase of an aerial ladder, the department first must determine whether a mid-mount, rear-mount or a tractor-drawn version will meet the needs of the district best.
Next, the department should take an accurate inventory of the equipment that’s to be carried. The number of tools and equipment that’s carried must be considered in conjunction with vehicle axle weights. Single-rear-axle aerials can limit weight-carrying capabilities.
Body configurations on aerial apparatus are dictated by the type of aerial that the department elects to employ. Mid-mount aerials, rear-mount aerials and tractor-drawn aerials (TDAs) all offer different compartment layout options. Increasing the wheelbase to extend the length of the vehicle to add compartmentation isn’t an option. (The exception is the tractor wheelbase on a TDA, which can be extended at the expense of maneuverability.)
Because of aerial deployment stability necessities, all manufacturers have standard chassis dimensions for each of their various types of aerials. Depending on the ladder rating of the aerial, there might be two, four or six ground stabilizers. Thus, any adjustments to compartments must be done within those limitations.
Generally, a mid-mount aerial provides the least amount of compartment storage capability, and a TDA offers the most. Adding a pump complicates the equipment storage capability.
The number of ground ladders and where they are carried must be considered when planning for compartment storage, too. The “tunnel,” which is accessed from the rear of the vehicle, is the most common location for ground ladder and long-handle tool storage. However, some departments elect to carry ladders on the side(s) of the vehicle on top of the compartments.
Body materials
A department preference for a particular material might limit which manufacturer can build your vehicle. Most manufacturers have a preference as to the type of material that’s used to construct the body. Some manufacturers are flexible and will build with a variety of materials. That said, a material other than the manufacturer’s standard material might increase the cost of the vehicle.
Aluminum is the most common material that’s used in the construction of an aerial apparatus body. Stainless steel and galvanneal steel might be available. Generally speaking, each of these three materials has its advantages and disadvantages. Stainless steel is the most resistant to corrosion but is the most expensive. Generally, aluminum is lighter but isn’t as resistant to corrosion as stainless steel is. Galvanneal steel is the least expensive and the least resistant to corrosion.
Construction type
The most common methods of constructing bodies are extruded fabrication and formed fabrication, with modular body fabrication being a third and less common type of body construction.
Extruded bodies are built with extrusions that form a skeleton frame, with like materials finishing the compartment floor, sides and top on both the interior and exterior of the framing material. Extruded bodies require the most manhours in design and fabrication, use the most material, and, thus, are heavier and more expensive. Generally, extruded bodies are considered to be the strongest of the body designs. Usually, they are placed onto the apparatus chassis assembly in one piece and are attached directly to the frame.
There can be significant differences between manufacturers regarding the design and materials that are used for an extruded body. One manufacturer can use extrusions with an I-beam, another with 1 x 3-inch box channel and a third with custom-made extrusions.
Formed bodies are fabricated using sheet material that’s bent and welded to the desired size and shape. They are mounted onto the chassis using a structure that’s designed to help to support the load of tools and equipment. Generally, these bodies are lighter in weight and less expensive.
Again, the materials that are used for the fabrication of a formed body might vary. Some manufacturers use 1/8-inch aluminum body side panels with 3/16-inch aluminum floors; some use 3/16-inch aluminum for the floors and side panels of the compartments. With stainless steel, some use a combination of 12-gauge and 14-gauge stainless steel material, and others just use 12-gauge stainless steel.
Modular bodies are built with each compartment made as a single component, most often using the formed fabrication method. These individual compartments are bolted and/or welded together to complete the apparatus body. Like formed bodies, modular bodies are mounted onto the chassis using a support structure. The advantage for these is that a compartment can be unbolted and replaced if damaged after the vehicle is put into service.
The question becomes which method of fabrication is better. The most likely answer to that question would depend on who is asked, because opinions vary. One must do due diligence when preparing a specification. The material sizes, shapes and thicknesses are dictated by each manufacturer’s engineering and design protocols.
Extruded and formed apparatus body construction methods have been used industrywide for many years and have well-established records of success in the fire service. If the choices are driven by economics, generally, formed bodies are less expensive to build, and aluminum costs less than stainless steel does.
Compartments
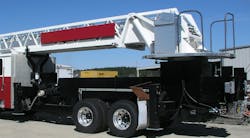
The design of aerial ladder compartments is a function of the space around the infrastructure of the chassis and aerial device. Figure 1 shows a rear-mount chassis and aerial prior to compartments being added. The torque box and aerial turntable are mounted on top of the chassis. This assembly limits the depth and arrangement of the compartments.
Note the height of the turntable and the ladder, because these affect the height of the compartments. The only available space for transverse through-to-the-opposite-side compartments is above the torque box, which would be difficult to access. In this case (quint setup), that space probably wouldn’t be as available, depending on the hosebed and water tank configurations.
Another limitation is the stabilizer configuration. All aerials are obviously engineered for maximum stability. The location of stabilizers is fixed. Thus, compartments must be designed around the stabilizers. Always remember to leave access to all of the aerial hydraulic components when laying out compartments through access panels that are within the compartments or in the body.

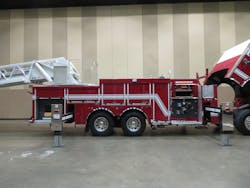
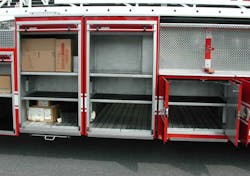
Also of note in Figures 2 and 3 is the rear overhang. The compartments that are behind the rear axle on both the rear-mount and the mid-mount can affect the angle of departure, but more so on the mid-mount. If the response district has critical locations where the angle of departure is important, the specification should include the necessary angle. The manufacturer can raise the rear-most compartment floor to allow for this angle, although at the expense of some compartment space.
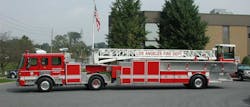
TDAs offer more compartment storage options than mid-mount and rear-mounts.
The ladder ride-height of the TDA that’s shown in Figure 4 is lower than on a rear-mount aerial, with the top of the tiller cab being the highest point on the vehicle. The top of the compartments is relatively low, thus making the highest points of these compartments useable.
As with the other aerials, the rear access is where the ground ladders are stored across the top of the frame rails. The side compartments can be reduced in height to accommodate ground ladder storage on the side(s) of the trailer.
On a TDA, the length of the wheelbase on the tractor can be extended at the expense of some maneuverability. This can be done to accommodate more storage or to add a pump module to the vehicle.
Each compartment should be carefully thought out to ensure that the desired tools can be carried on the apparatus as the specification is written.
The heaviest tools should be carried in the most accessible locations (preferably low). If it’s necessary for two firefighters to carry a heavier tool, the tool should be located on roll-out trays that are mounted in the bottom of the compartment, so each firefighter can access the tool from each side. Roll-out trays typically are rated at 400–500 lbs. and are convenient places to store portable generators and rescue tools.
For storage at eye level, fixed shelves make sense. Less bulky and lighter items can be stored on these shelves. If specified with an adjustable track on each sidewall, these shelves can be adjusted to more efficiently fit tools and equipment. For storage at higher locations in compartments, tilt-down trays can be handy for reaching the equipment that’s up there.
Careful planning should be completed to determine what can be stored on tool boards without interfering with other tool boards or mounted tools, remembering that tools can be mounted on both sides of the tool boards. Often, departments over-specify tool boards, believing that they will fit easily into compartments.
Specialized tool storage mounting brackets should be included in the specification to reduce the time that’s needed to get the vehicle in service.
On paper, one might look at the vehicle, see these large compartments and conclude that all of this space is available for tool storage. Don’t forget that cord reels for electrical power and hydraulic power might be mounted in these compartments.
Power outlets (12-volt and 120-volt) should be planned for carefully. Apparatus invariably carry battery-operated hand tools that need charging points when stowed in compartments.
Compartment doors
Roll-up doors versus hinged doors is a topic of discussion that seems to break down simply to the preference of the decision-maker. There are arguments in favor and against either door design.
Aerial apparatus probably are the most expensive apparatus that a department will purchase. Considering that a new aerial apparatus might have to last 20–30 years, it’s important for the department to do its homework.
There must be a balance between what’s desired to be carried and what can be carried on the vehicle. Seeking guidance from apparatus manufacturers during the specification preparation process ensures that the department’s goals and objectives will be met when the vehicle arrives. Working with the apparatus dealer and manufacturer to design a body that works for your department’s duty cycle and anticipated loading, with an allowance for future growth, offers the best outcome.
About the Author

Jeffrey D. Gaskin
Jeffrey D. Gaskin is president of Big Red Trucks Fire Apparatus Consultants. He is a retired captain from the Scarsdale, NY, Fire Department. Throughout his career, Gaskin has been involved in apparatus acquisitions, from needs assessment through specification-writing. He also is a fire apparatus mechanic and holds certifications from Allison Transmission, Detroit Diesel, Hale Pump, Smart Power, Spartan Chassis, Sutphen Fire Apparatus and others. Gaskin is certified by the Emergency Vehicle Technician Certification Commission in six areas: Fire Apparatus Inspection, Maintenance and Testing (F-1); Design and Performance Standards of Fire Apparatus (F-2); Fire Pumps and Accessories (F-3); Aerial Fire Apparatus (F-5); Allison Automatic Transmission (F-6); and Hydraulic Systems (F-8). He can be reached at [email protected].

Greg Stone
Greg Stone is a retired 33-year veteran of the Los Angeles Fire Department. His assignments with the department included apparatus and equipment purchasing responsibilities. Additionally, Stone has 25 years of apparatus purchasing experience assisting other departments with their purchasing needs.