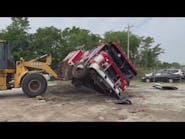
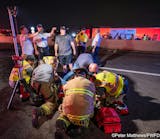
School bus crashes can happen anywhere across the country. There are many on the roads throughout the year, even when school isn’t in full session. Furthermore, there are many old school buses in use as church buses, canoe livery buses, party buses, etc. Any of them can end up on its side in your jurisdiction.
Training and planning on the front-end of the incident ensures that you are prepared to deal with the challenges that are faced.
When a school bus crash is encountered, numerous facets that relate to stabilization can present themselves. Is the school bus on its side? Is it on its side and against an electric pole? Does it rest on another vehicle? Did the school bus come to rest down an embankment? Of course, these will be answered via your scene size-up, but possible circumstances must be considered and incorporated into training ahead of time.
Obviously, stabilization is crucial, because further movement of the school bus that’s beyond your control could create greater injury or hazard to trapped and injured occupants. First-due company bosses should size-up the incident quickly and begin to stabilize the incident. Many times, the quickest solution is to throw step-chocks or cribbing. In other instances, you might need to secure the bus with chains to prevent it from sliding down an embankment. You can use a come-along and/or a winch as well for the operations. Don’t forget that all chains, come-alongs, winches, straps, etc., have specific ratings. Ensure that you understand how much weight can be applied to all of your equipment. Rigging errors are unacceptable.
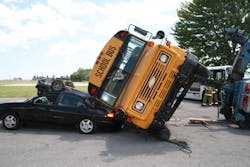
In the event that the school bus is rolled partially onto another vehicle, a Jersey barrier or other object, you must stabilize in place before extrication. Depending on the scenario, any movement can worsen the dynamics of the situation. Stabilizing the school bus in these scenarios often involves using an A-framed buttress system to prevent unwanted movement. Even though school buses can weigh as much as 12 tons, you don’t stabilize the full weight.
Manufactured stabilization struts that are on the market today can be deployed quickly to stabilize a partially side-resting school bus. Once again, be sure to understand the limitations, weight capacities and operations of the struts that you have on your rig and/or the struts that are on rigs that you potentially would request for help.
Remember this: You need multiple plans for stabilization, because there isn’t always a one-method-fits-all solution. This can include reaching out to your local heavy wrecker operators, which can be helpful in some situations. They often are excellent riggers, and they understand weights and can use their wreckers to stabilize or move heavy loads. Know in advance their contact information and how far away that they are. Of course, you must train with them before an incident, so operations are smooth during an emergency.
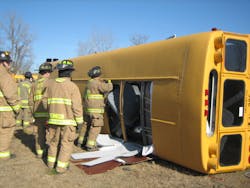
When a school bus ends up on its side, there are several options for gaining access to trapped and/or injured passengers. Sometimes the plan is challenged by what the crash presents to you, and you must adapt. If the crash provides you with an opening, you might or might not take advantage of it, depending on whether it fits the rescue plan.
Many school buses have emergency roof hatches that can be operated by occupants. Sometimes, the hatches are opened by occupants who evacuate before or upon the fire department’s arrival.
A general rule of thumb is that a school bus that’s equipped to transport people who have special needs might have 30 x 30-inch roof hatches. A school bus that isn’t so equipped might have 18 x 18-inch roof hatches. Keep in mind that if you see the larger roof hatches that you might have occupants who are in specialized wheelchairs or devices, and those occupants might need to be extricated while seated, etc., in those wheelchairs/devices for medical reasons.
Besides roof hatches, the windshield is the next weakest point of entry for rescuers. When the school bus is on its side, windshield removal creates a new front door for rescuers to enter or exit.
There are two main methods of windshield installation on school buses. An older system has a gasket that secures the glass to the frame (also several metal brackets near the center or corners of the glass, depending on manufacturer). To remove this glass, cut the gasket, pull the center bead of rubber from around the glass and use a prying device to remove the windshield.
A newer method has the entire piece of windshield glass glued to the frame. The fastest method for removal is cutting with a glass saw or a reciprocating saw.
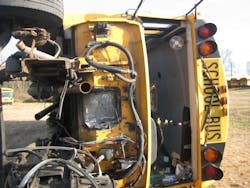
Entry through the rear door provides additional access. If the bus rests on the driver’s side, the door will swing upward. Consider removal at the hinges. Otherwise, if you prop open the door with a pike pole or other tool, the door very easily could swing down with force onto a victim or rescuer.
If the school bus rests on its passenger side, the rear door will open downward and toward the ground.
With either resting position, you can remove additional rear windows and frame to make the opening bigger if needed.
Going through the floor of a school bus is very time-consuming and should be avoided if at all possible. On the other hand, the roof can be breached very quickly to make additional openings for access, removal of victims or a path for sending equipment into the bus.
Roof bows align with the posts between the windows, and two stringers typically are found running front to back on the roof. Other than that thicker steel, you will find an outer sheet metal layer and inner sheet metal layer that must be cut to gain access. The pick on an axe can give you an opening through both layers of sheet metal, allowing a reciprocating saw blade to cut through all metal for the desired opening. A chisel is another good option, but it only cuts one layer at a time. Some might suggest using a rotary saw or a K-12-type saw. The negatives to using these saws: The sparks that bounce on the inside and outside of the multiple layers of sheet metal can start a fire or burn occupants, and the increased noise might create more chaos.
Roll-over pinning
A roll-over pinning from complete or partial ejection is possible anywhere. Just because it involves a school bus, the lift shouldn’t be delayed.
You have multiple options to lift the school bus and free the victims quickly. Firefighters often think of airbags when a lift is needed to be made, however, the school bus that rests on its side doesn’t involve a lot of weight, and other options can be faster. The bottom line: Consider what’s most efficient to expedite extrication.
Some options include:
- Spreaders: These are fast and powerful; cribbing must keep up with the speed; a soft surface can be a challenge
- Floor jack: This works well depending on the room that’s available and the surface on which the jack will rest
- High-lift jack: A purchase point for the jack tongue below the bottom stringer of the roof is needed; one jack works most times; two jacks spread the load
During the operation, always remember to crib and wedge as the lift is made.
Staying focused
You certainly prefer not to respond to a serious school bus crash, but you must be prepared with training and preplanning before the run is required. It isn’t difficult to find an old school bus that’s slated for the scrap yard. Take advantage of any opportunity to practice these skills.
School Bus Accident Response Hazards
On arrival, consider:
- Traffic hazards: You must ensure that traffic is diverted and controlled
- Electric hazards: Are any electric poles involved?
- Fuel hazards: A school bus that came to rest on the driver’s side might leak fuel from the fill neck; on the flip side, so to speak, is the school bus hybrid powered?
- Weather conditions: You must plan to care for the passengers and protect them from the elements
- Child safety: You must ensure that children are protected from ill-willed bystanders
Although not exactly in the realm of a hazard, depending on injuries, where are you going to get ambulances to handle the mass casualty incident?
Paul Hasenmeier
Paul Hasenmeier is the fire chief of the Sunset Beach, NC, Fire Department. He possesses a bachelor’s degree in fire science from Columbia Southern University (CSU) as well as a master’s degree in public administration from Capella University. He is a graduate of the National Fire Academy’s Executive Fire Officer Program. Additionally, Hasenmeier is trained as a firefighter, paramedic, instructor and fire inspector as well as in all of the technical rescue disciplines that are associated with NFPA 1670: Standard on Operations and Training for Technical Search and Rescue Incidents. In addition to his current duties and responsibilities, Hasenmeier is a lead faculty member at CSU, where he teaches online courses in their fire administration program. He also is an adjunct instructor for Bowling Green State University and teaches at their annual state fire school. Hasenmeier has presented on fire service topics across the United States and in Canada.
